
When I’m out at events and talking to NoSQL users and advocates, I often hear stories on why people have decided to start using Couchbase after having come from MongoDB. Take, for example, an interview I did with Tom Coates from Nuance. A big reason Nuance decided to drop MongoDB is because of its inability to scale in a simplified fashion. This is not the first time I’ve heard this story.
We’re going to explore what’s involved in scaling a NoSQL cluster with MongoDB and then accomplishing the same thing with Couchbase.
For MongoDB, sharding is one popular way to scale. Other databases approach the NoSQL clustering process differently. In every case, we’re interested in creating a multiple node cluster that includes data replication.
Creating a Multiple Node MongoDB Cluster
MongoDB is a NoSQL document database that has a master-slave architecture. When creating a cluster and scaling it, you’re to create and manage a sharded cluster and a replication set, which is another name for a replication cluster. These are pieces to a potentially large puzzle, and you’ll see how it can easily become complicated.
Because we plan to do everything locally, Docker becomes a good candidate for the job. We’re going to deploy several MongoDB Docker containers and scale them as part of a cluster.
The first order of business is to deploy all the necessary nodes for our cluster. Using the Docker CLI, execute the following commands:
|
1 2 3 |
docker run -d -p 27017-27019:27017-27019 -p 28017:28017 --name mongocfg1 mongo mongod --configsvr --replSet rs0 docker run -d -p 37017-37019:27017-27019 -p 38017:28017 --name mongoshd1 mongo mongod --shardsvr --replSet rs1 docker run -d -p 47017-47019:27017-27019 -p 48017:28017 --name mongoshd2 mongo mongod --shardsvr --replSet rs1 |
The above commands will create a configuration node that uses an rs0 replica set as well as two shard nodes that use an rs1 replica set. We’re just now starting our MongoDB instances and we’ve already got two different node types and replica sets to worry about.
Now we need to connect them all together to get replication and sharding in a functional state.
Let’s start by initializing replication on the two shard nodes that use the rs1 replica set. We’ll need to determine their container IP addresses to accomplish the job. From the Docker CLI, execute the following:
|
1 2 |
docker inspect mongoshd1 docker inspect mongoshd2 |
After obtaining the IP addresses, connect to one of the shard nodes via the following command:
|
1 |
docker exec -it mongoshd1 bash |
This allows us to control the container with the interactive shell. To initialize replication on these nodes, we need to launch the Mongo shell from the connected container:
|
1 |
mongo --port 27018 |
Once connected via the Mongo shell, execute the following:
|
1 2 3 4 5 6 7 |
rs.initiate({ _id : "rs1", members: [ { _id : 1, host : "172.17.0.3:27018" }, { _id : 2, host : "172.17.0.4:27018" } ] }); |
In the above command, remember to swap out the container IP addresses with the shard nodes you actually wish to use.
Once executed, you’ll be able to check the status of the nodes via the rs.status() command.
Now we need to prepare the configuration node. First determine the container IP like previously demonstrated and connect to it via:
|
1 |
docker exec -it mongocfg1 bash |
Once connected with the interactive shell, you’ll need to connect to MongoDB using the Mongo shell, but this time via a different port since it is a configuration node:
|
1 |
mongo --port 27019 |
Once connected to the configuration node via the Mongo shell, execute the following command to initialize the replica set:
|
1 2 3 4 5 6 |
rs.initiate({ _id : "rs0", members: [ { _id : 0, host : "172.17.0.2:27019" }, ] }); |
At this point we should be able to start configuring the shard nodes. Remember, previously we only configured the replicas on the shard nodes. Exit the Mongo shell on the configuration node, but don’t leave the interactive shell. We need to run a new command called mongos, to do even more configuration. Execute the following:
|
1 |
mongos --configdb rs0/172.17.0.2:27019 |
This will allow us to add shards via the Mongo shell. Unless you chose to run mongos in the background, you’ll need to open a new Terminal to use the Mongo shell.
Connect to mongocfg1 from a new Terminal and then connect using the Mongo shell. This time instead of using port 27019 you’ll be using port 27017.
Once connected, execute the following commands to add the shards:
|
1 2 |
sh.addShard("rs1/172.17.0.3:27018"); sh.addShard("rs1/172.17.0.4:27018"); |
In the above, remember, we’re using the IP addresses of the shard nodes and the shard node port.
With MongoDB’s sharding functions configured, we can now enable it for a particular database. This can be any MongoDB database you’d like. Enabling sharding can be done with the following:
|
1 |
sh.enableSharding("example"); |
We’re not done yet though. In MongoDB, sharding options exist on a range that includes Ranged Sharding and Hashed Sharding. Determine your approach for how you’ll shard data collections while keeping in mind your goal is to get the data in your database spread as evenly as possible around this NoSQL cluster.
Take the following command for example:
|
1 |
sh.shardCollection("example.people", { "_id": "hashed" }); |
The above command will create a shard key on _id for the people collection. Is it the best way to do things, maybe or maybe not, that is up to you to decide how you want to shard your data in MongoDB.
If you ever want to check the shard distribution you could run:
|
1 |
db.people.getShardDistribution(); |
As you can see from all the steps we went through, it was no small task in getting replication and sharding working in a cluster of MongoDB nodes. As you need to scale your cluster up and down, the task becomes even more cumbersome and it is something that frustrates companies.
This is where Couchbase comes into play!
Creating a Multiple Node Couchbase Cluster
While Couchbase is a document database just like MongoDB, things are a little different in its architecture. Couchbase uses a peer-to-peer (P2P) design which eliminates the master-slave design. In addition, every node in a cluster has the same design, meaning it will have data, indexing, and query services available. This eliminates the need to create specialized replication or sharded clusters.
So let’s take a look at creating a multiple node Couchbase cluster. Because we’re going to do everything locally, it makes sense to use Docker for this task.
Execute the following commands from your Docker CLI:
|
1 2 3 |
docker run -d -p 7091-7093:8091-8093 --name couchbase1 couchbase docker run -d -p 8091-8093:8091-8093 --name couchbase2 couchbase docker run -d -p 9091-9093:8091-8093 --name couchbase3 couchbase |
The above commands will create three Couchbase Server containers mapping the container ports to a different set of host ports.
Since this is Docker, each container will be a fresh installation of Couchbase. The goal of this guide is not to get up and running with Couchbase, so we won’t review how to go through each of the five configuration steps.
There are multiple ways to establish a cluster in Couchbase, so we’ll see a few. Of the three containers, configure two of them as new clusters.
The unconfigured node, let’s say couchbase1 will be the first one we add to the cluster. We are going to add it to the same cluster as the couchbase2 node. From your browser, navigate to http://localhost:7091 and choose to join a cluster.
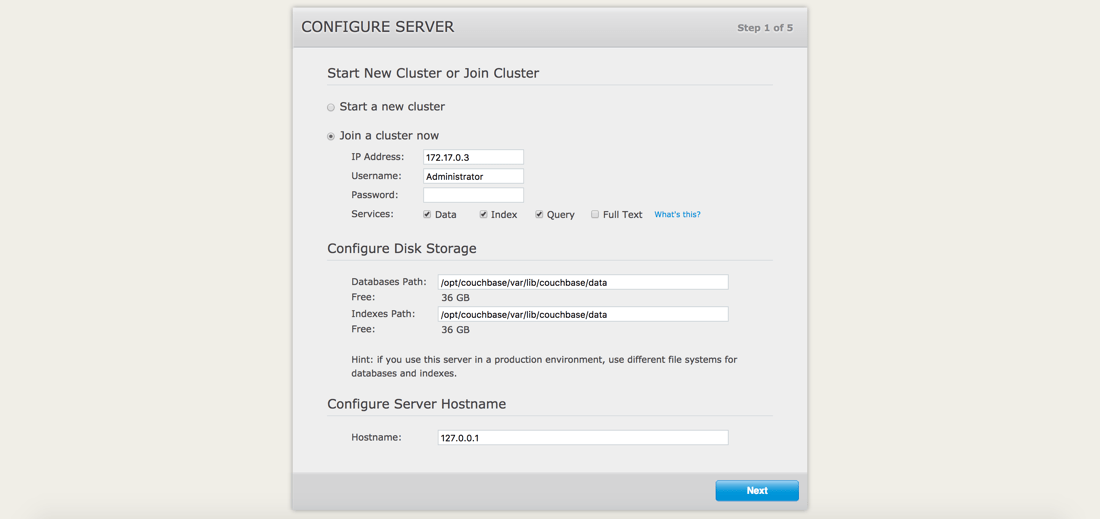
What matters here is IP address, administrative username and password of the other node, and the services you wish to be available.
Since we’re using Docker, it is important we use the correct IP address of the couchbase2 node. To find this IP address, execute the following command:
|
1 |
docker inspect couchbase2 |
Look for the IP address in the results. It is very important that you do not try to use localhost since that is only the bound address, not the actual container address.
After the couchbase1 node is added to the couchbase2 cluster, the cluster needs to be rebalanced.
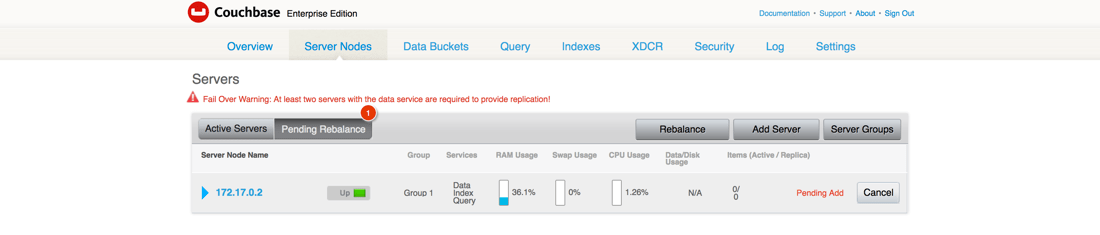
Rebalancing the cluster will distribute the Bucket data evenly across the cluster. A rebalance needs to happen every time you add or remove nodes from the cluster.
You now have a two node cluster with replication and automatic sharding of data. Now let’s check out adding that third, already configured node, to the cluster.
Since Couchbase is peer-to-peer, connect to either couchbase1 or couchbase2 and choose to add a new server to the cluster.

You’ll need to enter the node information for couchbase3, similar to how we did it previously. Remember to use the appropriate container IP address.
You just added a third node to the cluster. Don’t forget to rebalance to finish the process.
There is a CLI way of adding nodes to a cluster or joining a cluster, but we won’t get into that as it isn’t any more difficult to what we already saw. Scaling Couchbase is a two step process regardless if you have three nodes or fifty nodes.
If you’re really into Docker, I wrote a guide about automating this process for Couchbase in a previous article on the subject.
Conclusion
You just saw how much easier it is to create and scale a Couchbase Server cluster than it is with MongoDB. Extra complexity in your NoSQL database is a burden no operations or developer oriented person wants to deal with.
If you’re interested in further comparing Couchbase against MongoDB, I’ve written a few other developer oriented articles on the subject. For example, if you’d like to transfer your data from MongoDB to Couchbase, you can check out a Golang tutorial I wrote, or if you’d like to convert your Node.js RESTful API, you can also find material on the subject.
For more information on using Couchbase, check out the Couchbase Developer Portal.