
I am just getting started with NiFi, a tool to automate the flow of data. It’s a tool for migration, synchronization, and other types of data processing. It was introduced to me by one of Couchbase’s newest customers: the Cincinnati Reds.
In this post, I’ll describe what the Reds are using NiFi for and I’ll show you how to get up and running with a very basic data flow from SQL Server to Couchbase Server.
NiFi and the Reds
The Reds want to create some visualizations of tickets being scanned on game day at Great American Ball Park.
The data team has access to a SQL Server database which is used to store live data about a game. Whenever a ticket is scanned at the gate, data is put into this database. (This database also tracks concessions and other data).
The Reds could potentially query data directly from the SQL Server, but a real-time visualization during the heavy load of game time would result in a slow visualization or too much load for the database, or both. Instead, they’d like to copy that data into a Couchbase cluster, and use the cluster as the backend for the visualization.
There are a number of ways to move data from to Couchbase, but the Reds are already using open-source Apache NiFi with SQL Server, and it would be ideal if they could use that same combination for this project. Fortunately, NiFi already supports Couchbase, so it’s pretty easy to do.
Getting Started with NiFi and Couchbase
To start experimenting with NiFi locally, I decided to use Docker. Within the Docker host, I can easily spin up an instance each of:
- Couchbase Server (of course)
- Apache Nifi (Docker hub link)
- Microsoft SQL Server (for Linux—I don’t think the Reds are using SQL for Linux, but close enough)
You don’t need to use Docker, but it made it very easy for me to get up and running and productive right away.
Here are the commands I used to run the Docker images:
|
1 2 3 4 5 |
docker run -d --name db55beta -p 8091-8094:8091-8094 -p 11210:11210 couchbase:5.5.0-beta docker run -d --name NiFi -p 8080:8080 apache/nifi:latest docker run -d -e 'ACCEPT_EULA=Y' -e 'SA_PASSWORD=<use a strong password here>' -p 1433:1433 microsoft/mssql-server-linux:2017-latest |
Note that the password you supply to SA_PASSWORD must meet the strong password requirements of SQL Server. Otherwise, you will be unable to use SQL Server and get a little frustrated and confused for about 20 minutes.
Starting with SQL Server
I used SQL Server Management Studio to connect to the SQL Server instance in Docker (localhost, port 1433). I don’t (yet) have access to the Reds actual server, so I came up with my own schema to approximate:
|
1 2 3 4 5 6 7 8 9 10 11 12 13 14 15 16 17 |
CREATE TABLE [dbo].[TicketCheck]( [Id] [uniqueidentifier] NOT NULL, [FullName] [varchar](100) NOT NULL, [Section] [varchar](10) NOT NULL, [Row] [varchar](10) NOT NULL, [Seat] [varchar](10) NOT NULL, [GameDay] [datetime] NOT NULL, CONSTRAINT [PK_TicketCheck] PRIMARY KEY CLUSTERED ( [Id] ASC )WITH (PAD_INDEX = OFF, STATISTICS_NORECOMPUTE = OFF, IGNORE_DUP_KEY = OFF, ALLOW_ROW_LOCKS = ON, ALLOW_PAGE_LOCKS = ON) ON [PRIMARY] ) ON [PRIMARY] GO ALTER TABLE [dbo].[TicketCheck] ADD CONSTRAINT [DF_TicketCheck_Id] DEFAULT (newid()) FOR [Id] GO |
Later, I’ll be populating it with an INSERT statement like so:
|
1 2 3 4 5 6 7 |
INSERT INTO TicketCheck (FullName, Section, [Row], Seat, GameDay) VALUES ( 'Joey Votto', '429', 'C', '11', GETDATE() ) |
Setting up Couchbase
Once I logged in to Couchbase for the first time (localhost:8091) and created a cluster, I did two things:
- I created a bucket called “tickets”. This is where I want the data from SQL Server to go.
- I created a user also called “tickets”, with adequate permission for the bucket. It’s important that the user has the same name as the bucket.
The reason that you need to create a user with the same name is because the NiFi Couchbase processor is a little bit out of date, so this is a workaround. NiFi hasn’t been updated to handle the new RBAC capabilities of Couchbase, yet. See Apache Nifi issue 5054 for more information.
Setting up NiFi
NiFi is a web-based, visual data flow tool. I’m a developer, I’m used to code and command lines, but I definitely appreciate a nice visual interface when applicable.
If you used Docker, just visit localhost:8080/NiFi. You’ll see what looks like a big sheet of graph paper with a few toolbars/windows on top.
I’m going to skip a head a bit and show the complete data flow that I built:
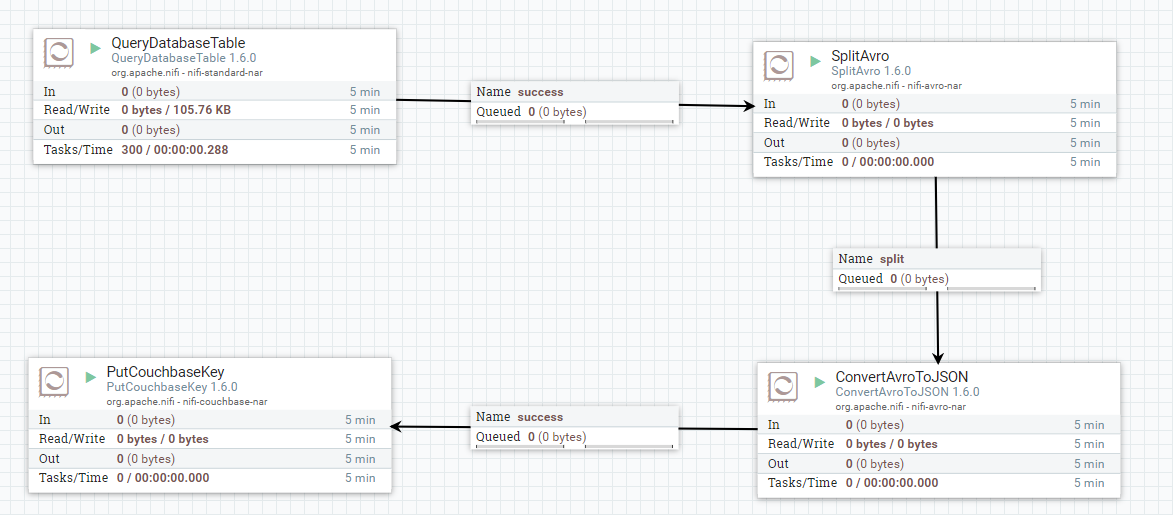
I’ll go through this step-by-step, but keep in mind that I’m not a NiFi expert.
At a high level, each of these boxes are “processors”. Each of them get data from somewhere, process the data in some way, and write the data somewhere else. This “flow” of data may come from an external source, a NiFi queue, or be written to an external source. Each processor can be “Started” and “Stopped”.
Database Connection Pooling Service
Before we create a processor, let’s tell NiFi about the databases we’ll be using.
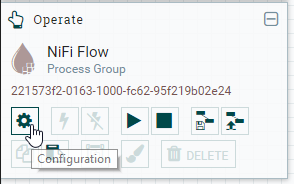
There’s an “Operate” window that’s floating over the graph paper. Click the settings icon to bring up the NiFi Flow Configuration window.
Look at the Controller Services tab. I think of this as a collection of external data sources that the processors can connect to. We’re going to add two controller services: one for SQL Server and one for Couchbase.
DBCPConnectionPool
Click the “+” button to add. Let’s start with SQL Server: find DBCPConnectionPool and click “Add”. It should appear in the list. Click the gear icon and navigate to the properties tab:
- Database Connection URL – Enter a value like
jdbc:sqlserver://172.17.0.4. - Database Driver Class Name – If you’re using SQL Server, it’s
com.microsoft.sqlserver.jdbc.SQLServerDriver - Database Driver Location(s) – Enter
file:///usr/share/java/mssql-jdbc-6.4.0.jre8.jar. Note that NiFi does not come with this driver out of the box (at least not the Docker image). Download this driver from Microsoft and put it in the /usr/share/java folder on your NiFi server (you can usedocker cpif you’re using Docker like me). - Database User and Password – The SQL Server credentials you need to connect.
Once you’ve added it, you’ll need to “enable” it (click the lightning icon) in order to use it. If you need to make changes in the future, you’ll need to disable it first.
CouchbaseClusterService
Next, let’s tell NiFi about Couchbase. Again, click the “plus” button to add. Look for CouchbaseClusterService. Again, navigate to the properties tab. There should be one property called Connection String. Enter something like couchbase://172.17.0.3. Next, click the “plus” button on this tab and create a new property called “Bucket Password for tickets”. Note that the property name must be of the form “Bucket Password for <your bucket name>”. The value of this property should be the password of the Couchbase user you created earlier.
Now, NiFi knows about SQL Server and Couchbase. Let’s put it to work.
QueryDatabaseTable
I’ll start with the source of the data: a SQL Server. More specifically, a table in SQL Server. And even more specifically, only new rows of data in that table (more on how to define that later).
First, drag the “processor” icon from the top left onto the graph paper. Then, find the QueryDatabaseTable processor and hit “add”. At this point, you’ll have a processor on the board with a warning icon that indicates you need to do some configuration.
You can double-click on this processor to bring up its details. I am primarily interested in the “Properties” tab. On this tab, I’m going to tell this processor what database to connect to and how to query data from it:
The properties of interest:
- Database Connection Pooling Service – Select the DBCPConnectionPool that was created earlier.
- Database Type – I selected MS SQL 2008, which seems to work fine with MS SQL for Linux, but there are also options for MS SQL 2012+ and “Generic”.
- Table Name – Enter the name of the table to query.
TicketCheckis the one I used. - Maximum-value Columns – I entered
GameDay. This is the column that NiFi will check against to find new/updated data in the table. You might want to use an auto-incremented field, or a timestamp, or some other combination. The NiFi processor will store the latest value in its “state” as it goes along.
PutCouchbaseKey
Let’s skip ahead a bit and create another processor. This time it will be a PutCouchbaseKey processor. All this processor does it take a piece of data that’s flowing into it and create/update a Couchbase document with that data.
To configure it, set these properties:
- Couchbase Cluster Controller Service – select the CouchbaseClusterService that was created earlier.
- Bucket Name – tickets
Getting from point A to point B
At this point, NiFi is able to pull data from SQL Server and put documents into Couchbase. To finish it off, they need to be connected. But there’s still a bit of work to do. the QueryDatabaseTable processor outputs “Avro” data, which is designed for Hadoop, but is also used by Spark and, of course, Nifi. We could feed this directly into Couchbase, but it would be stored as binary data, and not JSON. So, there are a couple of intermediate steps to get it into pure JSON form.
I added a SplitAvro processor and a ConvertAvroToJSON processor to the graph paper.
The SplitAvro processor will split the (potentially large) Avro data file into smaller files. This may not strictly be necessary, but it’s a good precaution to take, and it helps split up the data for easier viewing and debugging. The default properties of this processor are fine.
The ConvertAvroToJSON processor does exactly what it says. This will prepare the Avro data for Couchbase. I changed the JSON container options property from array to none. I just want a plain JSON document, and not an array containing a single document.
Connecting it all up
Now that you have these four pieces in place, you need to connect them.
First, hover over the QueryDatabaseTable until you see an arrow icon appear. Click and drag this arrow to the SplitAvro processor. A queue will appear between them named “success”.
Repeat this with the other processors. A processor may have a variety of termination points that define the relationship. For instance, when you drag a connection between SplitAvro and ConvertAvroToJSON, you will be presented with three choices: failure, original, and split. This will vary from processor to processor, but here’s the idea:
- failure – SplitAvro failed at the conversion, then it will send data to “failure”
- original – SplitAvro can pipe the original data out this way
- split – The actual split-up data goes this way. This is what you should feed in to ConvertAvroToJSON.
With the other connections, you could pipe the data back into the process to retry, or perhaps pipe it into some notification or debugging processor.
Turn on the NiFi flow
To start a processor, click on it and then click the “start” button in the Operate window (it looks like the play button on a VCR). You might want to experiment with just one processor at a time, and watch the data start to stack up in the queues. Ultimately, when you start inserting rows into the SQL Server table, they should end up as new documents in Couchbase Server.
In the above animation, I’m inserting two new rows to a table in SQL Server. NiFi (not pictured) is processing them and putting them into Couchbase.
Summary
This blog post provides background for how to get started with NiFi. There is plenty you can do. If you are at an enterprise with a variety of data sources, NiFi is a great tool to orchestrate all those data flows. Couchbase Server is a great fit as well:
- The flexibility of JSON allows you to ingest data from just about any source
- The memory-first architecture helps maximize the performance of your data flow
- The scaling capabilities of Couchbase allows you to increase your capacity without having to take your flow offline
I’m just learning NiFi for the first time, and I’m already loving the graphical interface and the simplicity of getting started. I still have a lot to learn, but hopefully this post will help you out with using the Couchbase processor in NiFi.
If you are using NiFi and couchbase, I want to hear from you. The Couchbase connector could use updated (see issue 5054), and the more of you that I hear from, the easier it is to justify the time spent working on it.
If you have questions about Couchbase, please check out the Couchbase Server forums. If you have questions about NiFi, check out the Apache Nifi project website.
I’m also happy to talk with you about all of the above. You can leave a comment below, or find me on Twitter @mgroves.