
After conversations with our customers about the delay in obtaining analytical insights from their Python-based machine learning models, we set out to create a seamless pipeline from Python to Couchbase Analytics that returns faster insights in real time.
Introduction
With the release of Couchbase Server 7.0, we’re excited to launch a new feature that you can explore in Developer Preview mode: integration of Python UDFs with Couchbase Analytics.
Machine Learning has radically transformed the ways in which organizations understand their customer’s needs. Advanced analytics domains like predictive analytics (customer churn, customer sentiment, etc.) and financial modeling are growing more reliant on processing data at scale, near real-time and extracting valuable insights from it.
This blog will walk through the process of setting up Couchbase instances, syncing to the remote AnalyticsML repository, creating the needed directories, and running the needed code samples.
The intended audience for this blog is anyone casually interested in the intersection of Couchbase Server, Machine Learning, Python, and the Couchbase Analytics service. There are certain concepts presented that we expect the reader to understand (but don’t worry, we will embed links to get you up to speed). Overall, we want anyone who has even the mildest interest to walk through this tutorial to see how the power of ML can be focused on data resident in Couchbase using their ML algorithms to gain instant insights.
Prerequisites And Assumptions:
Knowledge/understanding:
-
- Couchbase Server: https://docs.couchbase.com/server/current/learn/architecture-overview.html
- Installing Couchbase Server on Docker: https://docs.couchbase.com/server/current/install/getting-started-docker.html#multi-node-cluster-one-host
- Couchbase Analytics: https://docs.couchbase.com/server/current/analytics/introduction.html
- Sentiment Analysis using Sci-kit Learn: https://scikit-learn.org/stable/tutorial/basic/tutorial.html
Environment Configuration:
Additionally, in order to follow along with the below steps, you’ll need a functioning Couchbase implementation:
-
- An existing Python v3.8+ IDE of choice (I will use VSCode for this blog).
- Docker Desktop installed on your computer
-
1The code samples will be formatted to indicate what should be included in your sample
- The command line samples will be formatted in italics to denote what should be entered
- Within the Python examples, all the needed libraries are identified (sklearn is from scikit-learn). If you do not have those libraries, please install them with ‘pip3 install <library name>’
- The two datasets used for this blog can be found on kaggle at (https://www.kaggle.com/stefanoleone992/rotten-tomatoes-movies-and-critic-reviews-dataset). These are rather large files so a link to them is provided so you can download them when you follow along.
Setting Up Your Couchbase Server:
In this section, you will install and configure your Couchbase Server.
- From your terminal command line, create the nodes (‘cb-analytics’ & ‘cb’):
-
1docker run -d --name cb-analytics couchbase:7.0.2
-
1docker run -d --name cb -p 8091-8096:8091-8096 -p 11210-11211:11210-11211 couchbase
-
- To confirm the instance was launched successfully:
- docker logs db1
- If the container has started, the output should start with the following:
-
1Starting Couchbase Server -- Web UI available at http://:8091
-
- Discover the local IP addresses of cb and cb-analytics:
-
1docker inspect --format '{{ .NetworkSettings.IPAddress }}' cb
-
1docker inspect --format '{{ .NetworkSettings.IPAddress }}' cb-analytics
-

5. Go to http:// localhost:8091 to start the setup of your couchbase instance and select ‘Setup New Cluster’ and proceed through the Setup Wizard as normal:

- The Couchbase Server names are ‘cb’ and ‘cb-analytics’ with user name ‘Administrator’ and password ‘password’
- After the cluster is initialized on the first Couchbase Server node (cb), the next step is to add the Couchbase Server nodes from cb-analytics to the cluster.
- In the Couchbase Web Console, go to the Servers tab and click ADD SERVER. This opens the ‘Add Server Node’ dialog.
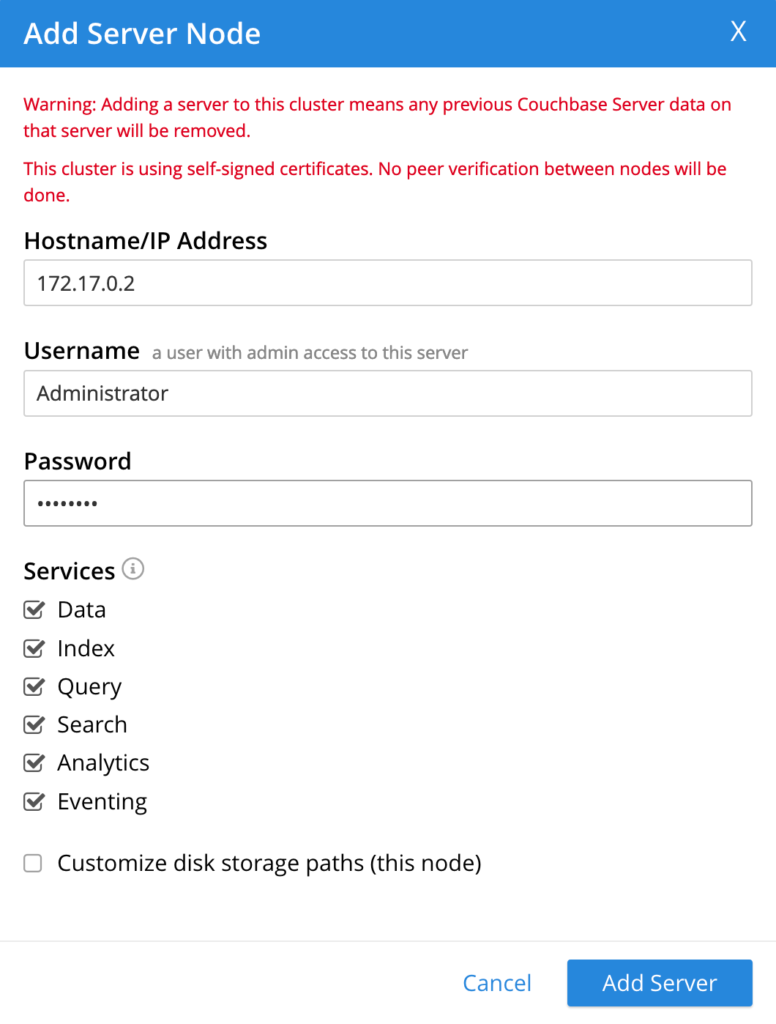
- In the Hostname/IP Address field, enter the IP address that you previously captured for cb. Click Add Server to add the node to the cluster configuration.
- After cb and cb-analytics are successfully added to the cluster configuration, click Rebalance to make the new nodes active in the cluster.
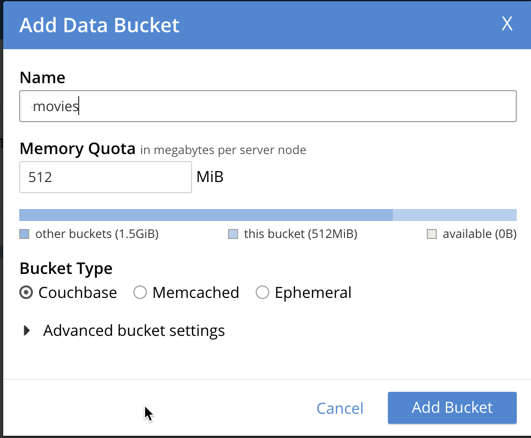
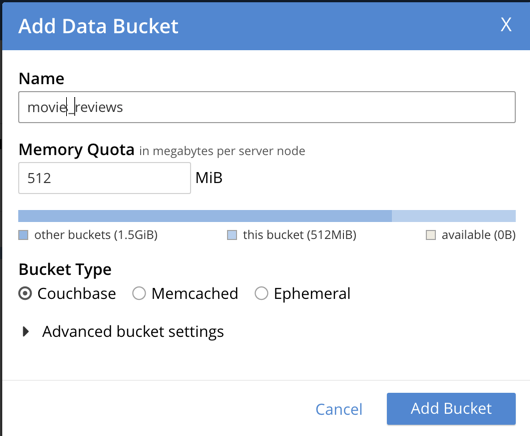
- Create two buckets, one for ‘movies’ and one for ‘movie_reviews’:
- You now have a multi-node Couchbase cluster running in containers on a single host. Your two buckets and your Couchbase instance are ready to run (if you need more details, here is the link to the steps in more detail).
WARNING: COUCHBASE SERVER MUST BE IN DEVELOPER PREVIEW MODE. SETTING COUCHBASE SERVER TO THIS MODE IS A NON-RECOVERABLE CHANGE AND IT IS STRONGLY RECOMMENDED NOT TO MAKE THIS CHANGE TO A PRODUCTION ENVIRONMENT OR CRITICAL SYSTEM.
Setting up Couchbase Server in Developer Preview mode requires you to run the following in a command line.
|
1 |
/opt/couchbase/bin/couchbase-cli enable-developer-preview -c localhost:8091 -u Administrator \ -p password --enable |

Setting Up Your File System:
- The files for this exercise and training dataset can be found within the github repo

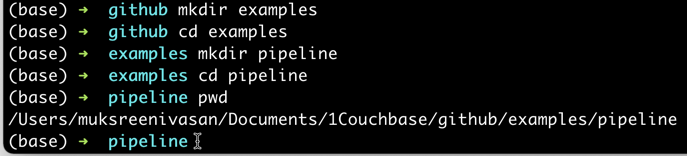
- You will need to create a folder to work within to keep your contents separate from your other activities (i.e. examples/AnalyticsML) and within that folder you will need to create another folder called ‘pipeline’.
You just set up the needed Couchbase Server environment on Docker. In Part 2, we will set up the needed code samples, import the function and finally run the sentiment analysis function from Couchbase Analytics.
Want to learn more about Couchbase Analytics? Watch the full ConnectONLINE session here:
Acknowledgments
Thanks to Anuj Kothari, a summer Product Management Intern for Couchbase Analytics service, who’s initial efforts got this started and off the ground last summer. Thanks to Idris Motiwala, Principal Product Manager on the Couchbase Analytics Service, and Ian Maxon, a software engineer for the Couchbase Analytics Service, for their editorial work in making this a more functional blog.