
It’s not a straightforward question to answer: How do I move my on-premises, virtualised or public cloud solution over to a shiny new fully managed cloud infrastructure – with as little disruption as possible?
Migration concerns are high on the list of every developer working in the cloud, and I hope to address those questions and concerns in this blog post.
The previous post in this series was An Introduction to Couchbase Cloud. This blog post included a high-level overview of Couchbase Cloud, of how it came to be, and some pointers to get you started on your Couchbase Cloud journey. The success of the first post prompted me to write this next article in the series. The logical next step to address is migration.
Prior to the release of the fully managed Database-as-a-Service (DBaaS) version of Couchbase, you could deploy the NoSQL platform on any infrastructure you wanted: bare metal servers, Docker containers, virtual machines, public and private clouds, or whatever else fit into your currently technology stack. Couchbase aims to support it all.
That also means making your next migration or data transfer between any given platform as seamless as possible, including any migrations to Couchbase Cloud. However, migration involves a lot more than just transferring your data. Your previous configurations might also include services, indexes, and users that need to be moved across as well.
The goal of this article is to walk you through step-by-step some of the most common actions to take when going through the migration process as simply as possible. In a few cases, my colleagues have already written detailed instructions about particular steps, so I’ll reference those when needed.
Now, let’s give you a head start on your Couchbase Cloud migration journey.
Create Your Cloud
Before you even start with a migration, you need something to migrate to.
In my previous blog post, we went through an introduction to Couchbase Cloud, with pointers on how to get started. If you haven’t done so already, read that article first and spin up your first cloud.
One of the first things to consider is the size of the cluster you are going to migrate too. In a lot of cases, you want to mimic the size and shape of your original infrastructure.
Couchbase Cloud offers an endless supply of flexible choices for whatever nodes, sizes or service configurations you need to deploy. It’s worth noting that instance types are something you should research and consider before spinning up the exact same infrastructure in Couchbase Cloud. It’s important to know the different sizes of machines, especially the amount of RAM and CPU which a given node has.
If you have any past experience with Couchbase Server, you know that different services consume resources more heavily. For example, the Query Service is more CPU-intensive than memory, so choosing a CPU-heavy instance might be your best option for these nodes.
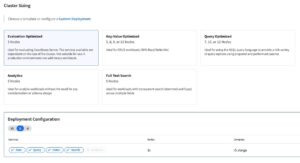
If you were looking for a best practise, my recommendation would be to make sure you look at your current deployment and try to match it as closely as possible to what you have already. To start, this will suffice nicely.
User Migration
Couchbase Cloud provides two types of users: Couchbase Cloud users and database users.
Couchbase Cloud users have access to login to https://cloud.couchbase.com/ and interact mainly with the control plane. These users have three options: Admin, Edit and View. These users are created for the main administration of the Couchbase Cloud Platform. From the control plane they have access to the main Dashboard, Connecting Cloud Service Providers, Creating Users, Billing details and other Activities from the underlying Clusters.
Database users also have access to the control plane. However, these users have access to the individual clusters, services and underlying data. These users create buckets, build indexes, run queries etc. These users also provide the credentials that your application SDKs use to interact with the cluster. You can limit the level of access and control these database users have on different clusters and buckets within your organisation.
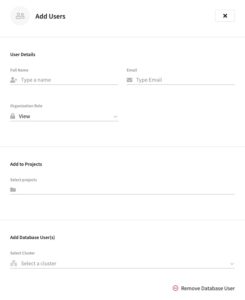
Creating both types of users is trivial: there’s a simple form to fill out and nothing more. These users then receive emails notifying them of the access they’ve just been provided. For long-standing users of Couchbase, this is also a great opportunity for you to assess who exactly has what access to different information.
Projects in Couchbase Cloud
Couchbase Cloud introduces the concept of Projects.
Many Couchbase customers use Couchbase to support multiple, different applications. Projects give you a chance to logically organise these clusters into groups. Simply create a new project and deploy your relevant clusters inside it.
Bucket Migration
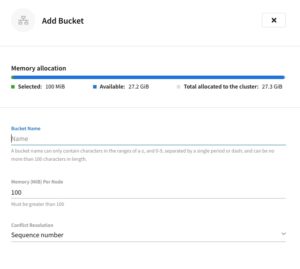
Couchbase Buckets are what many people refer to as databases, and they are your first logical layer of storage within a cluster.
Creating these buckets is simple – and even simpler if you’ve already used Couchbase Server. Inside each cluster, there is a buckets tab, selecting “Add Bucket” pops out a form-fill, which includes the name of the bucket, memory allocation and conflict resolution options. Simply create the new bucket, provide it with the relevant information and you should be ready to start migrating data across to the cluster.
Data Migration
Now it’s time for the main part of the show: Data migration. There are two main methods of data migration in Couchbase Cloud: offline Migration and online Migration.
Online Data Migration
We’ll start with online data migration because it’s the most common.
Online migration is the process of moving or replicating the data across to another active cluster, while the original cluster is still operational and taking traffic. This approach eradicates the need for downtime, which is one of the major benefits of a NoSQL technology like Couchbase.
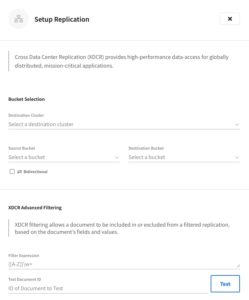
The tool we are going to utilise is called XDCR, or Cross Data Center Replication. It allows you to configure bidirectional or unidirectional replication streams between two buckets on different clusters. This continuous replication is a consumer of the Data Change Protocol (DCP) which propagates data mutations instantaneously around your cluster, ensuring that the replication is picking up these changes also.
Only a few steps are required to connect your self-managed cluster into Couchbase Cloud and set up a replication stream:
- Connect your self-managed cluster within the project where your destination cluster lives.

- Fill in the information for your self-managed cluster, uploading certificates if required, then hit save.
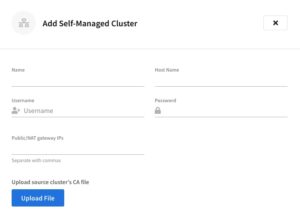
- Add a replication stream from your source and destination buckets, including any advanced filtering and start replicating.
From here, add as many replication streams as you need, and repeat the process for any additional self-managed clusters.
Once the data has been replicated, this is a great opportunity to test everything from an application and performance standpoint until you’re satisfied the transition can be made smoothly. Once the new cluster is connected and operational with your application, you are good to go. At this point, feel free to leave the self-managed cluster there, or remove it from the project and decommission these nodes when suitable.
Simple, right?
Offline Data Migration
Offline data migration is for migrating data that isn’t being actively written to. In these scenarios, you need to capture the data as it is, then bring that captured data over to Couchbase Cloud.
To begin this process, you’ll need a fixed dataset ready to import. If you have an existing Couchbase Cluster, use cbexport to export your existing data. But as long as the data is in the correct format, it can come from any source.
Datasets you can be import this way include:
-
- JSON List
- JSON Lines
- CSV
- Archive
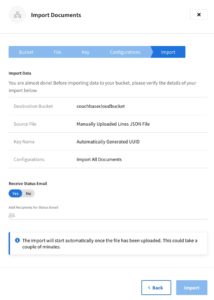
Once you have an appropriate dataset, use the import functionality within the Couchbase Cloud control plane to ingest the data into an existing bucket. This can be found within the cluster, under the “Tools” dropdown.
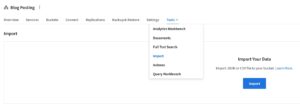
From here, clicking on “Import” prompts a dialog where you explicitly define the destination bucket, import file type, key generation and any additional configurations. When everything Is ready then select “Import” for the data import to begin.
For more information on offline data migration, my colleague Prasad Doddi wrote a great article on the new and improved import process in Couchbase Cloud.
N1QL Index Migration
The first few sections above should cover most use cases which utilise the key-value cache in Couchbase. However, some clusters out there have been extended to harness Querying capabilities through the Couchbase query language, N1QL (like SQL for JSON).
Just like SQL, N1QL queries require indexes in order to execute queries successfully. And as you likely know, indexes require fine tuning in order to optimize them for a specific query. With all the time you spent on such indexes, you want to make sure they’re transferred properly.
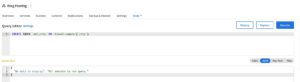
The first approach to migrating indexes is the manual approach. In your existing cluster, search for index definitions in the index section of the given UI. Bring up these definitions next to your Couchbase Cloud cluster, go to the Query Workbench, and start running the Index Definition commands until you have a complete set of indexes which match your original environment.
For large environments, or environments where Querying is the predominant method of retrieving data, this approach to index definitions starts to become too verbose. In this case, there are too many indexes to migrate over, so you need a simpler method.
There is also a programmatic approach to migrating your indexes, and you’ll need the cbshell command-line tool. You can migrate your indexes in four easy steps:
- Install
cbshellonto a system which has internet access to both clusters - Create a
configfile which defines both your source self-managed cluster and your destination cloud cluster. - Enter the source cluster and migrate the definitions over to the cloud cluster.
- Enter the destination cloud cluster and build the new indexes.
This article by my colleague goes into more detail about migrating from Couchbase Server to Couchbase Cloud, including index migration.
Personally, I believe the manual approach is just as quick (if not quicker) than the programmatic approach. The manual index migration approach is also a great opportunity to review your currently deployed indexes. You might find indexes you no longer need, or your older index definitions might need a tune-up for improved performance.
On the other hand, querying and indexing could be huge for some implementations. You might have hundreds of indexes spanning multiple clusters. The manual approach would be a too-time-consuming monolithic task. In this scenario, definitely adopt the programmatic approach.
Full-Text Search Index Migration
Some of your clusters might have Full-Text Search (FTS) capabilities enabled in the services pool.
Just like with querying, Full-Text Search requires indexes. Replicating these FTS indexes across to Couchbase Cloud requires an approach similar to manual index migration detailed above.
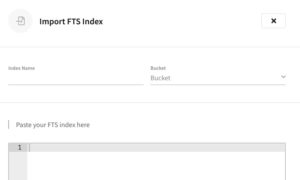
To achieve this manual migration, grab the index definitions of your Full Text Search index and copy it over to your new Couchbase Cloud cluster. Even though this is currently a manual process, it shouldn’t be too challenging of a task to complete.
Conclusion
That’s your step-by-step guide to migrating into Couchbase Cloud, including users, buckets, data and indexes of every kind. I hope you found this introduction helpful, and I hope to write more articles in this introductory series to Couchbase Cloud.
Catch up with the rest of the posts in this series on getting started with Couchbase Cloud: