
The third of three articles focused on building Fullstack React and GraphQL with the Apollo GraphQL Client.
- Setting up a NoSQL Couchbase Server (Part 1)
- Building an Express-GraphQL API (Part 2)
- Create Apollo GraphQL Client in React (Part 3)
- Final Source Code
Creating the React Application with an Apollo GraphQL client
In this segment of the tutorial, I will help you plug in the parts related to using Apollo GraphQL. I’ve included most of the React app that you will need in a GitHub repo. This premade code that we clone into our project will be a React project that was built with Create Rect App and has routing, navigation, menus, responsive behavior, state and context being managed as well as some utility and other components to support a basic app architecture. I wanted to make sure we only needed to worry about setting up the Apollo GraphQL client, but I wanted to do it in the context of a working application.
Clone an Existing React Application
Our decoupled React frontend will be a sibling to the couchbase-gql-server directory. here is a basic idea of what our directory structure will look like:
|
1 2 3 4 5 |
rage-with-couchbase │ └───couchbase-gql-server │ └───react-apollo-client |
Let’s clone the starting point for our React project by running the following git command from the root (rage-with-couchbase directory) in our terminal:
|
1 |
git clone https://github.com/httpJunkie/react-apollo-client.git && cd react-apollo-client && rm -rf .git |
In the command above, we removed the .git directory as we do not want to take on the existing git history from the project we cloned into our project. You will need to initialize git on your own and periodically commit if you want to. It’s encouraged so that you don’t lose your work.
We now have a working React application added to our project with basic routing. There are some components and utilities that exist in the React project but are not yet hooked up. Before we get to them, let’s run the React application on its own just to make sure everything is working with no errors:
|
1 |
npm install && npm start |
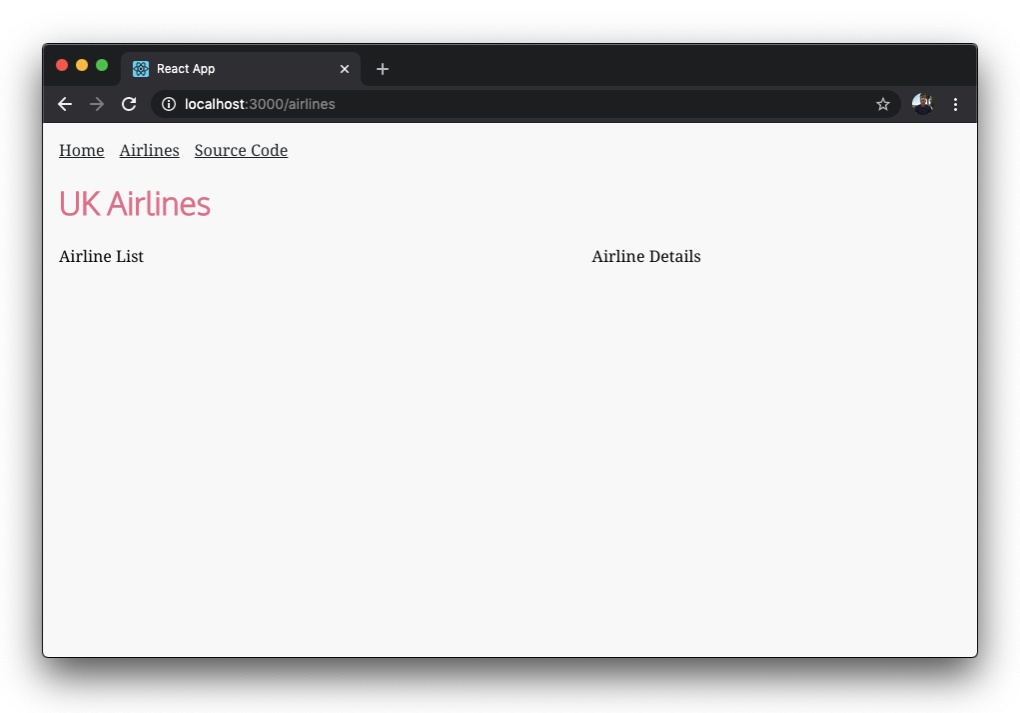
Open the console (⌘ Cmd + ⌥ Option + I on Mac) (Ctrl + ↑ Shift + J on PC)
Ensure that clicking back and forth from Home to Airlines does not generate any errors and that there are no errors or major warnings. What we see in this preview is the Airlines route, it is the route we will be adding our master-detail feature to. It’s like someone else already took care of all the styling and basic layout, our job will be to hook up the airline-list.jsx and airline-details.jsx file in place of the current placeholder text on each side of the page. Luckily our design team has ensured that all of the layout and CSS work is complete!
Before we make changes to the React app, let’s understand some of the files that we have in our project that are not yet in play with our Airline route.
Overview of Our Assets
There are 6 files we want to make ourselves familiar with that are standing by and awaiting our use.
- hoc/withApolloProvider.js
- partial/airline-list.jsx
- partial/airline-details.jsx
- utility/pagination.jsx
- utility/pagination.scss
- routes/airline-gql.js
A convention that we are using regarding directory structure is that components in the “routes” directory are React components that are resolved to form a specific route and those files inside of the “partial” directory are components that are not a view loaded by a route, but instead a partial view or a component that could potentially be reused in our application. This is a convention I use, not something React forces us to do.
withApolloProvider – I am using a higher-order component for readability. Just understand that this is similar to importing the ApolloProvider into a parent component. This may not be best practice, but I like that it keeps my code tidy.
|
1 2 3 4 5 6 7 8 9 10 11 12 13 14 15 16 17 |
import React from 'react' import { ApolloProvider, InMemoryCache, ApolloClient } from '@apollo/client'; const withApolloProvider = (WrappedComponent, graphqlEndpoint) => { const apolloClient = new ApolloClient({ uri: graphqlEndpoint, cache: new InMemoryCache() }) return (props) => ( <ApolloProvider client={apolloClient}> <WrappedComponent {...props} wrappedBy={"withApolloProvider"} /> </ApolloProvider> ) } export default withApolloProvider |
We have airline-list.jsx and a airline-details.jsx, these two components will get loaded side by side in our airlines.jsx component. The list will simply display each airline and uses pagination.jsx to ensure we don’t have a long list running down the left side of the page.
Finally, we have the airline-gql.js file which is simply our GraphQL query for all UK Airlines. I like to separate my queries out into another file for organizational purposes, it’s not required, but it cleans up the airlines.jsx file.
How Our Master-Detail Page Works
In our project, we have a master-detail component relationship (airline-list.jsx && airline-details.jsx), at the /airlines route. This route resolves to a view component named: airlines.jsx, which utilizes React Router’s capabilities to match not only the route but an additional URI parameter (airlineId) which we can append to the end of the route to be specific. When no specific airlineId URI parameter is present in the URL:
http://localhost:3000/airlines
It will only display a list of airlines on the left side. As well, a link will show up on the right side of the page that reads: “Select an airline”.
Selecting an airline from the menu will load the details on the right side of the page. Once clicked, we will update the URL with the proper id using a <Link /> component provided by React Router:
http://localhost:3000/airlines/1355
Here we will match the ID 1355 with the correct airline already in memory in our React application data and display its appropriate Airline information “British Airways”.
Adding Dependencies for our Apollo GraphQL client
We need three packages: @apollo/react-hooks, apollo-boost, and graphql, brought into the project so let’s cd into the react-apollo-client directory and run the npm install for the packages we need for GraphQL and Apollo:
|
1 |
npm install @apollo/client graphql |
If you would like to familiarize yourself with Apollo and GraphQL, the GraphQL documentation for queries, is an ideal place to start, also see: GraphQL documentation on making queries in Apollo and React.
Building The Master-Detail Page
The airlines.jsx file is where we will be doing most of our work. Let’s start by adding some imports:
|
1 2 |
import { useQuery } from '@apollo/client' import { airlineGql } from './airline-gql' |
Underneath the import { airlineGql } line, we need to import withApolloProvider, a higher-order component.
|
1 |
import withApolloProvider from '../hoc/withApolloProvider' |
This wraps our component with an Apollo Provider. I have used this method instead of wrapping our entire application with an ApollloProvider. An attempt to make the code I am sharing a little less complex. We will update the airlines.jsx file’s export.
The line that reads:
export default Airlines
should be changed to:
|
1 2 |
const WrappedComponent = withApolloProvider(Airlines, 'http://localhost:4000/graphql') export default WrappedComponent |
Our first argument to the HOC is a React Component Airlines (this component). Therefore, when our app is rendered, the <Airlines /> component will be wrapped with our ApolloProvider. A provider in React is a function of the Context API. Context provides data throughout the component tree in our React application without having to pass data down through props manually. In our case, the <Airlines /> component will be wrapped with our provider giving it access to the data provided by the Apollo Client code defined in that withApolloProvider higher-order component.
Our final imports are the two components that I have already built for you (airline-list.jsx and airline-details.jsx):
|
1 2 |
import AirlineList from '../partial/airline-list' import AirlineDetails from '../partial/airline-details' |
Once those two files are imported we can add their component syntax to our flexbox grid (simple-flexbox that we have created helping us to easily split our page by a percentage:
|
1 2 3 4 5 6 7 8 |
<Row horizontal="spaced"> <Column flexGrow={1} style={{ minWidth: '280px', width: '65%' }}> <AirlineList airlines={airlines} /> </Column> <Column flexGrow={1} style={{ width: '45%' }}> <AirlineDetails airline={airline} /> </Column> </Row> |
With all of this in place, we just need to deal with our data. useQuery returns an object from the Apollo GraphQL client with loading, error, and data properties that we can use. We also need to match on our route’s path (from the URL). Access to that is easy with React Router: (match.params).
Let’s bring React Router’s match in by destructuring the props to the Airlines Component::
|
1 |
const Airlines = ({ match }) => { |
Next, we will add the following to the top level of our Airlines Component:
|
1 2 3 4 5 6 7 8 |
const airlineId = Number(match.params.id) const { loading, error, data } = useQuery(airlineGql) if (loading) return <p>Loading...</p> if (error) return <p>Error :( <span style={{color: 'red'}}>{error.message}</span> )</p> const airlines = data.airlinesUK const airline = match.params.id ? airlines.find(a => a.id === airlineId) : null |
What have we just done:
- Set
airlineIdif thematch.params.idreturns a number and notundefined(do we have an ID in our route path/airlines/1355or not/airlines/?). - Using the GraphQL query string exported in our
airlineGqlfile. Remember that it returns stuff, so we are destructuring those here as well. - Return “loading” until the data has finished loading
- Return “Error” in the case our GraphQL server is not running or has an error, etc…
- Capture the data for all of the airlines returned from our query into a local variable named
airlines - If
match.params.idcontains a number it means our route contains an ID, in this case we capture the data for that specific airline into a local variable namedairlineotherwise we store a null value in that variable.
The match will work because of the way we set up our route in the App.js page:
|
1 2 3 |
<Route exact path={["/airlines/:id", "/airlines/"]} render={(props) => <Airlines {...props} />} /> |
This route in effect says: Look for a route with the name /airlines/ and anything after it will be available using the match.params.id syntax.
If we run our project right now and our GraphQL Server is not running, we get an error.
“Error :( Network error: Failed to fetch )”
So we need to start that server before we run our React app to test our master-detail page.
Running Our Full Stack application
To run our fullstack React and GraphQL project, we will need to first add one more package:
|
1 |
npm install cors |
Our app is hosted under one domain (localhost:3000). It makes requests to an API on another domain (localhost:4000). Without CORS the browser’s same-origin policy will block the request.
CORS allows our API to tell the browser that it’s OK for our web app to make requests to it. It does this by sending HTTP headers. We need to use CORS in our Express-GraphQL server. Just add the following code to replace the existing first seven lines.
|
1 2 3 4 5 6 7 8 9 |
const express = require('express') const cors = require('cors') const graphqlHTTP = require('express-graphql') const { buildSchema } = require('graphql') const couchbase = require('couchbase') const app = express() app.use(cors()) |
To get familiar with CORS from the front to the back, check out an article titled: “How to enable CORS for Express-GraphQL & Apollo Server”
At this point, we just need to ensure our Couchbase Server instance is up and running.
From the server directory run the node command to start the Express-GraphQL server:
|
1 |
node server |
Next, from the client directory lets run the command to start our React client:
|
1 |
npm start |
The React application connects to the Express-GraphQL API, which in turn queries the Couchbase database to retrieve the Airline data, and now we should have a working app if we visit: localhost:3000
Using Postinstall and Concurrently
Now that everything’s working, let’s update the project to run both projects with one npm command.
We need to initialize an npm project in our root directory. The server and client both have their own project directories. We give the root directory its own package.json file with only one dependency.
Change directories to the root and run:
|
1 |
npm init -y && npm install concurrently --save-dev |
This will initialize npm and accept all defaults (otherwise remove the -y flag) and install the package we need to concurrently run both projects with one command.
Let’s set up two scripts named client and server to run each project individually and then a start script to run client and server concurrently.
We also will use postinstall to run each project’s npm install script independently when the root’s npm install is complete. postinstall is part of npm scripts by default. All of these changes that we make below will enable someone to clone your repo, run npm install && npm start to which will kick off all three installs, and then concurrently run each project.
Replace the package.json that was just added with the following scripts:
|
1 2 3 4 5 6 |
"scripts": { "client": "cd react-apollo-client && npm start", "server": "cd couchbase-gql-server && node server", "start": "concurrently --kill-others \"npm run server\" \"npm run client\"", "postinstall": "(cd couchbase-gql-server && npm install); (cd react-apollo-client && npm install);" }, |
We have initialized npm at the root of our project, set up two scripts for client and server that we can run concurrently with npm start. Also, when someone clone’s our repository, they can now run: npm install && npm start and it will install all packages from the three projects and afterward spin them up, so long as they have Couchbase Server running, it will all just work.
Remove User and Pass From Server File
One final touch is to move the username and password for our Couchbase connection credentials to a .env file. This will ensure we don’t ship sensitive credentials to GitHub for the world to see.
Change directories to couchbase-gql-server/ and install dotenv:
|
1 |
npm install dotenv --save-dev |
Next, import dotenv and use object destructuring to get access to the variables we have set up in our .env file:
|
1 2 |
require('dotenv').config() const { cbUser, cbPass } = process.env |
Update the code where we use the username and password:
|
1 2 3 |
const cluster = new couchbase.Cluster('couchbase://localhost', { username: cbUser, password: cbPass }) |
Create a file in our couchbase-gql-server directory named .env with our Couchbase Server credentials:
|
1 2 |
cbUser=Administrator cbPass=password |
We also need to update the server directories .gitignore file. There is a block of ignores labeled #misc, let’s modify that block of ignores and add .env to it. Remember this file does not get uploaded to git as part of our course control.
|
1 2 3 4 5 6 7 |
# misc .DS_Store .env .env.local .env.development.local .env.test.local .env.production.local |
Let’s run our project from the root using npm start to ensure that everything still works!
Project Recap
We have set up a fullstack React and GraphQL project. Utilizing Couchbase Node SDK and Apollo GraphQL client & server, we leverage our knowledge of JavaScript to build a fullstack app. I hope this tutorial helps in your quest to dominate fullstack JavaScript.
I’m available on Twitter @httpJunkie, feel free to reach out, my DM is always open! Check out the links provided below to get more information on building with Apollo and React.
The final code for this project can be found on GitHub at:
github.com/httpJunkie/rage-with-couchbase-final
Apollo and React Resources
- Apollo GraphQL
- Apollo GraphQL Documentation
- The Benefits of Apollo GraphQL
- React Apollo on GitHub
- Apollo Client With React on LevelUp Tuts
- Apollo + GraphQL + React — Thinking in Queries with James Baxley