
Prologue
Modern business applications are expected to be up 24/7, even during the planned rollout of new features and periodic patching of the Operating System or application. Achieving this feat requires tools and technologies that ensure the speed of development, infrastructure stability and ability to scale.
Container orchestration tools like Kubernetes is revolutionizing the way applications are being developed and deployed today by abstracting away the physical machines it manages. With Kubernetes, you can describe the amount of memory, compute power you want, and have it available without worrying about the underlying infrastructure.
Pods (unit of computing resource) and containers (where the applications are run) in a Kubernetes environment can self-heal in the event of any type of failure. They are, in essence, ephemeral. This works just fine when you have a stateless microservice but applications that require their state maintained for example database management systems like Couchbase, you need to be able to externalize the storage from the lifecycle management of Pods & Containers so that the data can be recovered quickly by simply remounting the storage volumes to a newly elected Pod.
This is what Persistent Volumes enables in Kubernetes based deployments. Couchbase Autonomous Operator is one of the first adopters of this technology to make recovery from any infrastructure-based failure seamless and most importantly faster.
In this article we will take a step-by-step look at how you can deploy Couchbase cluster on Amazon Elastic Container Service for Kubernetes (Amazon EKS): 1) using multiple Couchbase server groups that can be mapped to a separate availability zone for high availability 2) leverage persistent volumes for fast recovery from infrastructure failure.
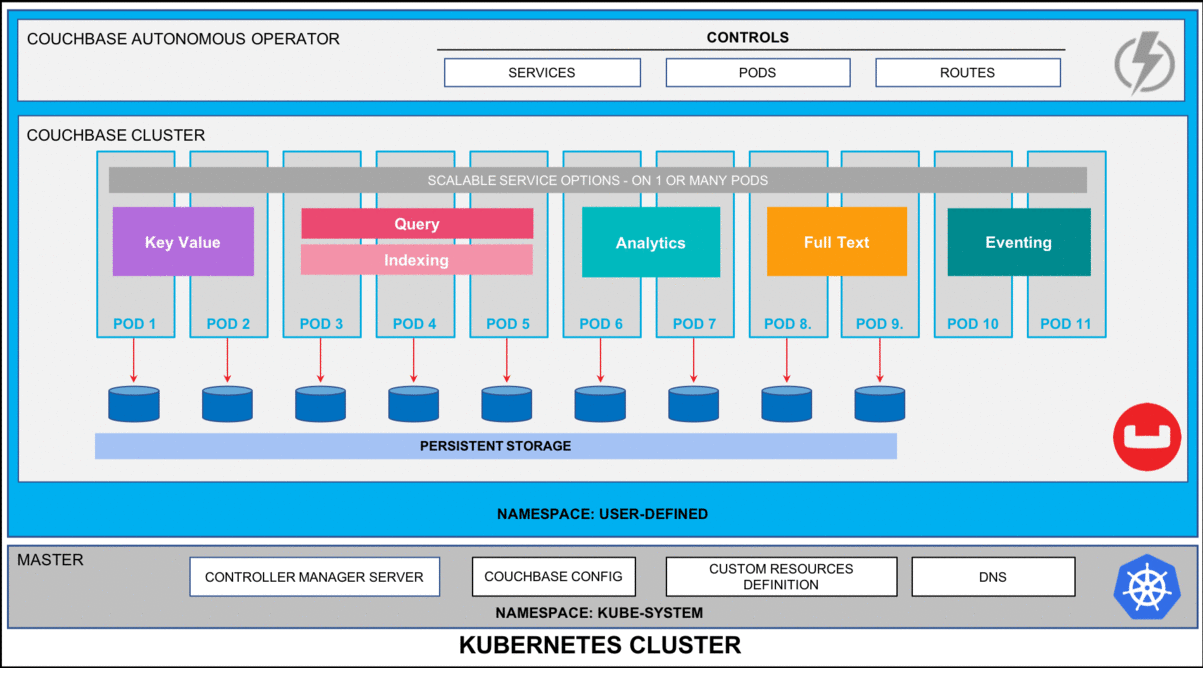
Figure 1: Couchbase Autonomous Operator for Kubernetes self-monitors and self-heals Couchbase database platform.
1. Prerequisites
There are three high-level prerequisites before we begin the deployment of Couchbase Autonomous Operator on EKS:
- You have kubectl installed on our local machine.
- Latest AWS CLI is configured so that we can securely establish a channel between our local machine and the Kubernetes control plane running on AWS.
- Amazon EKS cluster is deployed with at least three worker nodes in three separate availability zones so we can later deploy and manage our Couchbase cluster. We will be using us-east-1 as the region and us-east-1a/1b/1c as three availability-zones but you can deploy to any region/zones by making minor changes to YAML files in the examples below.
2. Deploy Couchbase Autonomous Operator
Before we begin with the setup of the Couchbase Operator, run ‘kubectl get nodes’ command from the local machine to confirm EKS cluster is up and running.
|
1 2 3 4 5 6 |
$ kubectl get nodes NAME STATUS ROLES AGE VERSION ip-192-168-106-132.ec2.internal Ready <none> 110m v1.11.9 ip-192-168-153-241.ec2.internal Ready <none> 110m v1.11.9 ip-192-168-218-112.ec2.internal Ready <none> 110m v1.11.9 |
After we have tested that we can connect to Kubernetes control plane running on Amazon EKS cluster from our local machine, we can now begin with the steps required to deploy Couchbase Autonomous Operator, which is the glue technology enabling Couchbase Server cluster to be managed by Kubernetes.
2.1. Download Operator package
Let’s first begin by downloading the latest Couchbase Autonomous Operator and unzip it onto the local machine. Change directory to the operator folder so we can find YAML files we need to deploy Couchbase operator:
|
1 2 3 4 5 6 7 8 |
$ cd couchbase-autonomous-operator-kubernetes_1.2.0-981_linux-x86_64 $ ls License.txt couchbase-cli-create-user.yaml operator-role-binding.yaml secret.yaml README.txt couchbase-cluster.yaml operator-role.yaml admission.yaml crd.yaml operator-service-account.yaml bin operator-deployment.yaml pillowfight-data-loader.yaml |
2.2. Create a namespace
Create a namespace that will allow cluster resources to be nicely separated between multiple users. To do that we will use a unique namespace called emart for our deployment and later will use this namespace to deploy Couchbase Cluster.
In your working directory create a namespace.yaml file with this content and save it in the Couchbase operator directory itself:
|
1 2 3 4 |
apiVersion: v1 kind: Namespace metadata: name: emart |
After saving the namespace configuration in a file, run kubectl cmd to create it:
|
1 |
$ kubectl create -f namespace.yaml |
Run get namespace command to confirm it is created successfully:
|
1 2 3 4 5 6 7 |
$ kubectl get namespaces output: NAME STATUS AGE default Active 1h emart Active 12s |
From now onwards we will use emart as the namespace for all resource provisioning.
2.3. Add TLS Certificate
Create secret for Couchbase Operator and servers with a given certificate. See how to create a custom certificate section if you don’t have one.
|
1 2 3 |
$ kubectl create secret generic couchbase-server-tls --from-file chain.pem --from-file pkey.key --namespace emart secret/couchbase-server-tls created |
|
1 2 3 |
$ kubectl create secret generic couchbase-operator-tls --from-file pki/ca.crt --namespace emart secret/couchbase-operator-tls created |
2.4. Install Admission Controller
The admission controller is a required component of the Couchbase Autonomous Operator and needs to be installed separately. The primary purpose of the admission controller is to validate Couchbase cluster configuration changes before the Operator acts on them, thus protecting your Couchbase deployment (and the Operator) from any accidental damage that might arise from an invalid configuration. For architecture details please visit documentation page on the Admission Controller
Use the following steps to deploy the admission controller:
- From the Couchbase operator directory run the following command to create the admission controller:
|
1 |
$ kubectl create -f admission.yaml --namespace emart |
- Confirm the admission controller has deployed successfully:
|
1 2 3 4 |
$ kubectl get deployments --namespace emart NAME DESIRED CURRENT UP-TO-DATE AVAILABLE AGE couchbase-operator-admission 1 1 1 1 1m |
2.5. Install CRD
The first step in installing the Operator is to install the custom resource definition (CRD) that describes the CouchbaseCluster resource type. This can be achieved with the following command:
|
1 |
kubectl create -f crd.yaml --namespace emart |
2.6. Create an Operator Role
Next, we will create a cluster role that allows the Operator to access the resources that it needs to run. Since the Operator will manage many different namespaces, it is best to create a cluster role first because you can assign that role to a service account in any namespace.
To create the cluster role for the Operator, run the following command:
|
1 |
$ kubectl create -f operator-role.yaml --namespace emart |
This cluster role only needs to be created once.
2.7. Create a Service Account
After the cluster role is created, you need to create a service account in the namespace where you are installing the Operator. To create the service account:
|
1 |
$ kubectl create serviceaccount couchbase-operator --namespace emart |
Now assign the operator role to the service account:
|
1 2 3 4 5 6 |
$ kubectl create rolebinding couchbase-operator --role couchbase-operator \ --serviceaccount emart:couchbase-operator --namespace emart output: clusterrolebinding.rbac.authorization.k8s.io/couchbase-operator created |
Now before we proceed further let’s make sure all the roles and service accounts are created under the namespace emart. To do that run these three checks and make sure each get returns something:
|
1 2 3 |
Kubectl get roles -n emart Kubectl get rolebindings -n emart Kubectl get sa -n emart |
2.8. Deploy Couchbase Operator
We now have all the roles and privileges for our operator to be deployed. Deploying the operator is as simple as running the operator.yaml file from the Couchbase Autonomous Operator directory.
|
1 2 3 4 5 |
$ kubectl create -f operator-deployment.yaml --namespace emart output: deployment.apps/couchbase-operator created |
The above command will download the Operator Docker image (specified in the operator.yaml file) and creates a deployment, which manages a single instance of the Operator. The Operator uses a deployment so that it can restart if the pod it’s running in dies.
It would take less than a minute for Kubernetes to deploy the Operator and for the Operator to be ready to run.
a) Verify the Status of the Deployment
You can use the following command to check on the status of the deployment:
|
1 |
$ kubectl get deployments --namespace emart |
If you run this command immediately after the Operator is deployed, the output will look something like the following:
|
1 2 |
NAME DESIRED CURRENT UP-TO-DATE AVAILABLE AGE couchbase-operator 1 1 1 0 10s |
Note: Above output means your Couchbase operator is deployed and you can go ahead with deploying the Couchbase cluster next.
b) Verify the Status of the Operator
You can use the following command to verify that the Operator has started successfully:
|
1 |
$ kubectl get pods -l app=couchbase-operator --namespace emart |
If the Operator is up and running, the command returns an output where the READY field shows 1/1, such as:
|
1 2 |
NAME READY STATUS RESTARTS AGE couchbase-operator-8c554cbc7-6vqgf 1/1 Running 0 57s |
You can also check the logs to confirm that the Operator is up and running. Look for the message: CRD initialized, listening for events… module=controller.
|
1 2 3 4 5 6 7 8 9 10 11 |
$ kubectl logs couchbase-operator-8c554cbc7-6vqgf --namespace emart --tail 20 output: time="2019-05-30T23:00:58Z" level=info msg="couchbase-operator v1.2.0 (release)" module=main time="2019-05-30T23:00:58Z" level=info msg="Obtaining resource lock" module=main time="2019-05-30T23:00:58Z" level=info msg="Starting event recorder" module=main time="2019-05-30T23:00:58Z" level=info msg="Attempting to be elected the couchbase-operator leader" module=main time="2019-05-30T23:00:58Z" level=info msg="I'm the leader, attempt to start the operator" module=main time="2019-05-30T23:00:58Z" level=info msg="Creating the couchbase-operator controller" module=main time="2019-05-30T23:00:58Z" level=info msg="Event(v1.ObjectReference{Kind:\"Endpoints\", Namespace:\"emart\", Name:\"couchbase-operator\", UID:\"c96ae600-832e-11e9-9cec-0e104d8254ae\", APIVersion:\"v1\", ResourceVersion:\"950158\", FieldPath:\"\"}): type: 'Normal' reason: 'LeaderElection' couchbase-operator-6cbc476d4d-2kps4 became leader" module=event_recorder |
3. Deploy Couchbase cluster using persistent volumes
In a production environment where performance and SLA of the system matters most, we should always plan on deploying Couchbase cluster using persistent volumes because it helps in:
- Data Recoverability: Persistent Volumes allow the data associated within Pods to be recovered in the case that a Pod is terminated. This helps prevent data loss and avoid time-consuming index building when using the data or index services.
- Pod Relocation: Kubernetes may decide to evict pods that reach resource thresholds such as CPU and Memory Limits. Pods that are backed with Persistent Volumes can be terminated and restarted on different nodes without incurring any downtime or data loss.
- Dynamic Provisioning: The Operator will create Persistent Volumes on-demand as your cluster scales, alleviating the need to pre-provision your cluster storage prior to deployment.
- Cloud Integration: Kubernetes integrates with native storage provisioners available on major cloud vendors such as AWS and GCE.
In this next section, we will see how you can define storage classes in different availability zone and build a persistent volume claim template, which will be used in couchbase-cluster-with-pv-1.2.yaml file.
3.1. Create Secret for Couchbase Admin Console
The first thing we need to do is create a secret credential that will be used by the administrative web console during login. For convenience, a sample secret is provided in the Operator package. When you push it to your Kubernetes cluster, the secret sets the username to Administrator and the password to password.
To push the secret into your Kubernetes cluster, run the following command:
|
1 2 3 4 5 |
$ kubectl create -f secret.yaml --namespace emart Output: Secret/cb-example-auth created |
3.2 Create AWS storage class for the EKS cluster
Now in order to use PersistentVolume for Couchbase services (data, index, search, etc.), we need to create Storage Classes (SC) first in each of the Availability Zones (AZ). Let’s begin by checking what storage classes exist in our environment.
Let’s use kubectl command to find that out:
|
1 2 3 4 5 |
$ kubectl get storageclass Output: gp2 (default) kubernetes.io/aws-ebs 12m |
The above output means we just have default gp2 storage class and we need to create separate storage-classes in all of the AZs where we are planning to deploy our Couchbase cluster.
1) Create an AWS storage class manifest file. The below example defines the structure of the storage class (sc-gp2.yaml), which uses the Amazon EBS gp2 volume type (aka general purpose SSD drive). This storage we will later use in our VolumeClaimTemplate.
|
1 2 3 4 5 6 7 8 9 10 11 12 13 14 15 16 |
For more information about the options available for AWS storage classes, see [AWS](https://kubernetes.io/docs/concepts/storage/storage-classes/#aws) in the Kubernetes documentation. ``` apiVersion: storage.k8s.io/v1 kind: StorageClass metadata: labels: k8s-addon: storage-aws.addons.k8s.io name: gp2-multi-zone parameters: type: gp2 provisioner: kubernetes.io/aws-ebs reclaimPolicy: Delete volumeBindingMode: WaitForFirstConsumer ``` Above we used ```reclaimPolicy``` to _Delete_ which tells K8 to delete the volumes of deleted Pods but you can change it to _Retain_ depending on your needs or if for troubleshooting purpose you would like to keep the volumes of deleted pods. |
2) We will now use kubectl command to physically create a storage class from the manifest files we defined above.
|
1 2 3 4 5 6 7 |
``` $ kubectl create -f sc-gp2.yaml Output: storageclass.storage.k8s.io/gp2-multi-zone created ``` |
3) Verify New Storage Class
Once you’ve created all the storage classes, you can verify them through kubectl command:
|
1 2 3 4 5 6 7 8 9 |
``` $ kubectl get sc --namespace emart output: NAME PROVISIONER AGE gp2 (default) kubernetes.io/aws-ebs 16h gp2-multi-zone kubernetes.io/aws-ebs 96s ``` |
3.3. Server Groups Awareness
Server Group Awareness provides enhanced availability as it protects a cluster from large-scale infrastructure failure, through the definition of groups.
Groups should be defined in accordance with the physical distribution of cluster-nodes. For example, a group should only include the nodes that are in a single server rack, or in the case of cloud deployments, a single availability zone. Thus, if the server rack or availability zone becomes unavailable due to a power or network failure, Group Failover, if enabled, allows continued access to the affected data.
We, therefore, place Couchbase servers onto separate spec.servers.serverGroups, which are going to be mapped to physically separated EKS node running in three different AZs (us-east-1a/b/c):
|
1 2 3 4 5 6 7 8 |
spec: servers: - name: data-east-1a size: 1 services: - data serverGroups: - us-east-1a |
3.4. Add Storage Class to Persistent Volume Claim Template
With Server groups defined, and Storage Classes available in all three AZs, we are now going to create dynamic storage volumes and mount them on each of the Couchbase servers that requires persistent data. In order to do that, we will first define the Persistent Volume Claim Template in our couchbase-cluster.yaml file (which can be found from the operator folder).
|
1 2 3 4 5 6 7 8 9 10 11 12 13 14 15 16 17 18 19 20 21 22 23 |
Spec: volumeClaimTemplates: - metadata: name: pvc-default spec: storageClassName: gp2-multi-zone resources: requests: storage: 1Gi - metadata: name: pvc-data spec: storageClassName: gp2-multi-zone resources: requests: storage: 5Gi - metadata: name: pvc-index spec: storageClassName: gp2-multi-zone resources: requests: storage: 3Gi |
After the claim template being added the final step is to pair the volume claim template with server groups accordingly in each of the zones. For instance, Pods within Server-Group named data-east-1a should use volumeClaimTemplate named pvc-data to store data and pvc-default for Couchbase binaries and log files.
For example, the following shows the pairing of a Server Group and its associated VolumeClaimTemplate:
|
1 2 3 4 5 6 7 8 9 10 11 12 13 14 15 16 17 18 19 20 21 22 23 24 25 26 27 28 29 30 31 32 |
spec: servers: - name: data-east-1a size: 1 services: - data serverGroups: - us-east-1a pod: volumeMounts: default: pvc-default data: pvc-data - name: data-east-1b size: 1 services: - data serverGroups: - us-east-1b pod: volumeMounts: default: pvc-default data: pvc-data - name: data-east-1c size: 1 services: - data serverGroups: - us-east-1c pod: volumeMounts: default: pvc-default data: pvc-data |
Notice that we have created three separate data server groups (data-east-1a/-1b/-1c), each located in its own AZ, using persistent volume claim templates from that AZ. Now using the same concept we will add the index, and query services and allocate them in separate server groups so they can scale independently of data nodes.
3.5. Deploy Couchbase Cluster
The full spec for deploying the Couchbase cluster across 3 different zones using persistent volumes can be seen in the couchbase-cluster-with-pv-1.2.yaml file. This file along with other sample yaml files used in this article can be downloaded from this git repo.
Please open the yaml file and note that we are deploying data service in three AZs but deploying index & query service in two AZs only. You can change the configuration to meet your production requirements.
Now use kubectl to deploy the cluster.
|
1 |
$ kubectl create -f couchbase-cluster-with-pv-1.2.yaml --save-config --namespace emart |
This will start deploying the Couchbase cluster and if all goes fine then we will have five Couchbase cluster pods hosting the services as per the configuration file above. To check the progress run this command, which will watch (-w argument) the progress of pods creating:
|
1 2 3 4 5 6 7 8 9 10 11 |
$ kubectl get pods --namespace emart -w output: NAME READY STATUS RESTARTS AGE cb_eks_demo-0000 1/1 Running 0 2m cb_eks_demo-0001 1/1 Running 0 1m cb_eks_demo-0002 1/1 Running 0 1m cb_eks_demo-0003 1/1 Running 0 37s cb_eks_demo-0004 1/1 ContainerCreating 0 1s couchbase-operator-8c554cbc7-n8rhg 1/1 Running 0 19h |
If for any reason there is an exception, then you can find the details of the exception from the couchbase-operator log file. To display the last 20 lines of the log, copy the name of your operator pod and run the below command by replacing the operator name with the name in your environment.
|
1 2 3 4 5 6 7 8 9 10 11 12 |
$ kubectl logs couchbase-operator-8c554cbc7-98dkl --namespace emart --tail 20 output: time="2019-02-13T18:32:26Z" level=info msg="Cluster does not exist so the operator is attempting to create it" cluster-name=cb-eks-demo module=cluster time="2019-02-13T18:32:26Z" level=info msg="Creating headless service for data nodes" cluster-name=cb-eks-demo module=cluster time="2019-02-13T18:32:26Z" level=info msg="Creating NodePort UI service (cb-eks-demo-ui) for data nodes" cluster-name=cb-eks-demo module=cluster time="2019-02-13T18:32:26Z" level=info msg="Creating a pod (cb-eks-demo-0000) running Couchbase enterprise-5.5.3" cluster-name=cb-eks-demo module=cluster time="2019-02-13T18:32:34Z" level=warning msg="node init: failed with error [Post http://cb-eks-demo-0000.cb-eks-demo.emart.svc:8091/node/controller/rename: dial tcp: lookup cb-eks-demo-0000.cb-eks-demo.emart.svc on 10.100.0.10:53: no such host] ...retrying" cluster-name=cb-eks-demo module=cluster time="2019-02-13T18:32:39Z" level=info msg="Operator added member (cb-eks-demo-0000) to manage" cluster-name=cb-eks-demo module=cluster time="2019-02-13T18:32:39Z" level=info msg="Initializing the first node in the cluster" cluster-name=cb-eks-demo module=cluster time="2019-02-13T18:32:39Z" level=info msg="start running..." cluster-name=cb-eks-demo module=cluster |
When all the pods are ready then you can port forward one of the Couchbase cluster pods so that we can view the cluster status from the web-console. Run this command to port forward it.
|
1 |
$ kubectl port-forward cb-eks-demo-0000 18091:18091 --namespace emart |
At this point, you can open up a browser and type https://localhost:18091 which will bring Couchbase web-console from where you can monitor server stats, create buckets, run queries all from one single place.
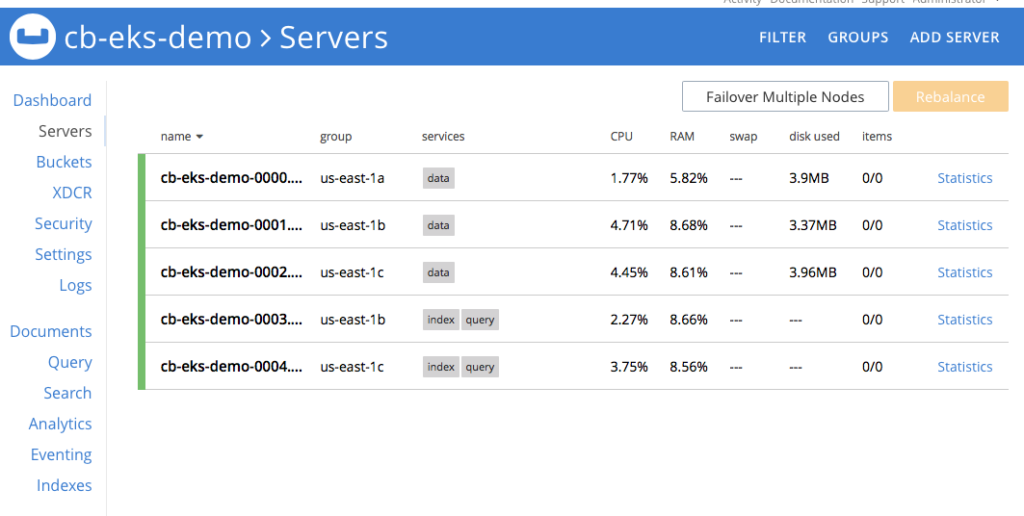
Figure 2: Five node Couchbase cluster using persistent volumes.
Note: Please visit our git repository to find the latest version of the above workshop.
Conclusion
Couchbase Autonomous Operator makes management and orchestration of Couchbase Cluster seamless on the Kubernetes platform. What makes this operator unique is its ability to easily use storage classes offered by different cloud vendors (AWS, Azure, GCP, RedHat OpenShift, etc) to create persistent volumes, which are then used by the Couchbase database cluster to persistently store the data. In the event of pod or container failure, Kubernetes re-instantiate a new pod/container automatically and simply remounts the persistent volumes back, making the recovery fast. It also helps maintain the SLA of the system during infrastructure failure recovery because only delta recovery is needed as opposed to full-recovery if persistent volumes are not being used.
We walked through step-by-step how you will set up persistent volumes on Amazon EKS in this article but the same steps would also be applicable if you are using any other open-source Kubernetes environment (AKS, GKE, etc). We hope you will give Couchbase Autonomous Operator a spin and let us know of your experience.