
With new tools such as Android Public Beta Testing and Testflight for iOS, shipping new updates of a native mobile application more regularly is a growing trend.
In addition to changing the business logic and data models more regularly, there is also a need to support previous versions. Unlike a website where the user always accesses the latest version from the browser, mobile apps can remain on a user’s device for an extended period of time without being updated.
In this tutorial, you will learn how to ship an update to your Android app with Couchbase Mobile. You will use a Sync Gateway webhook to import data from a 3rd party API on demand (in this case the Google Places API) with Node.js. In the first instance, the Android app will sync all of the data and in a subsequent version of the app, it will only pull a subset of those. Upon changing the access rules in the Sync Function, you will use the Sync Gateway resync operation to rebuild the access rules according to the updated Sync Function.
Let’s get started!
The order in which you will put together the different components is the following:
- Installing Sync Gateway
- Configuring the Webhook
- Building the App Server
- Building the Android app
Getting Started
Download Sync Gateway and unzip the file:
http://www.couchbase.com/nosql-databases/downloads#Couchbase_Mobile
You can find the Sync Gateway binary in the bin folder and examples of configuration files in the examples folder. Copy the basic-walrus-bucket.json file to the root of your project:
|
1 |
$ cp /Downloads/couchbase-sync-gateway/examples/basic-walrus-bucket.json /path/to/proj/sync-gateway-config.json |
Start Sync Gateway:
|
1 |
$ ~/Downloads/couchbase-sync-gateway/bin/sync_gateway |
Sync Gateway Webhook
The webhook is defined in the configuration file you created above and takes a url to POST to and a filter function (optional). Add the event-handlers field in sync-gateway-config.json with the following properties:
|
1 2 3 4 5 6 7 8 9 10 11 12 13 14 15 16 17 18 19 20 21 22 23 24 |
{ "log": ["*"], "databases": { "db": { "bucket": "default", "server": "http://localhost:8091", "users": { "GUEST": { "disabled": false, "admin_channels": ["*"] } }, "event_handlers": { "document_changed": [ { "handler": "webhook", "url": "http://localhost:8000/sync_request", "filter": `function(doc) { if (doc.type == "profile") { return true; } return false; }` } ] } } } } |
Here’s what each new field is doing:
- handler: You’re specifying the event type to be webhook
- url: The url to send the POST request to with the document in the message body
- filter: A function written in JavaScript to trigger the webhook only if it returns true. Notice here that the webhook will be executed only if the document has a type property equal to profile
Save the changes and restart Sync Gateway:
|
1 |
$ ~/Downloads/couchbase-sync-gateway/bin/sync_gateway ./sync-gateway-config.json |
App Server
In this section, you will use Node.js and the Express framework to setup an App Server to handle the webhook. In the same directory, install the necessary Node.js modules:
|
1 |
npm install express body-parser --save |
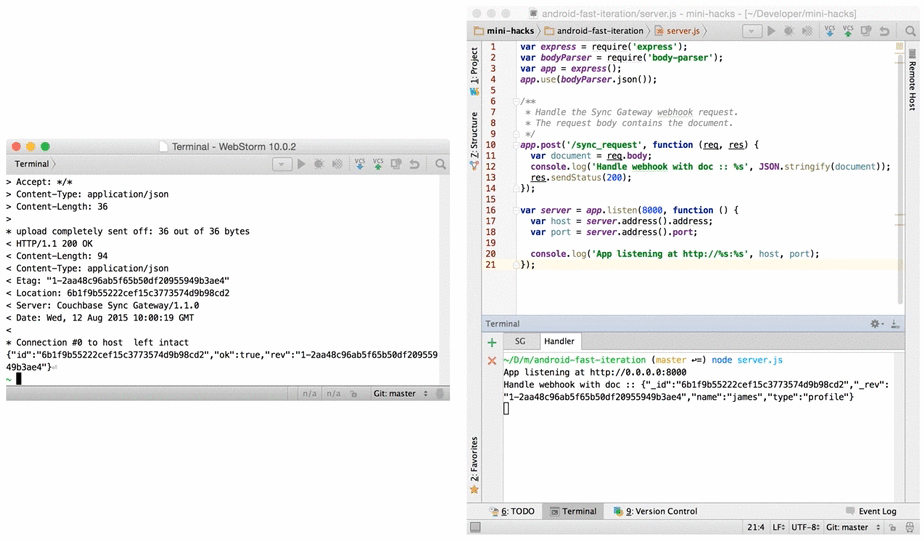
In a new file called server.js add the following code:
|
1 2 3 4 5 6 7 8 9 10 11 12 13 14 15 16 17 18 19 20 21 |
var express = require('express'); var bodyParser = require('body-parser'); var app = express(); app.use(bodyParser.json()); /** * Handle the Sync Gateway webhook request. * The request body contains the document. */ app.post('/sync_request', function (req, res) { var document = req.body; console.log('Handle webhook with doc :: %s', JSON.stringify(document)); res.sendStatus(200); }); var server = app.listen(8000, function () { var host = server.address().address; var port = server.address().port; console.log('App listening at http://%s:%s', host, port); }); |
Start the Node.js App Server by running node server.js and save a document to Sync Gateway using the REST API to make sure the webhook is working:
|
1 2 3 |
$ curl -vX POST :4984/db/ -H 'Content-Type: application/json' -d '{"type": "profile", "name": "james"}' |
You should see the following output in the logs of the App Server:
Great! The webhook is working. Next, you will add some code to import the JSON data from the Places API into Sync Gateway. To do so, you will use RxJS and Request. Code that deals with more than one event or asynchronous computation gets complicated quickly. RxJS makes these computations first-class citizens and provides a model that allows for readable and composable APIs. And the Request module is the de-facto library to make http requests in NodeJS simpler than ever. In the same directory, go ahead and install the dependencies:
|
1 |
$ npm install request rx --save |
Copy requestRx.js from this GitHub repo to your project folder. We’re simply wrapping the Request API in RxJS constructs (flatMap, filter, subscribe…). For example, instead of using request.get, you will use requestRx.get.
Open a new file called sync.js, require the requestRx and Rx modules and add the following code:
|
1 2 3 4 5 6 7 8 9 10 11 12 13 14 15 16 17 18 19 20 21 22 23 24 25 26 27 28 29 30 31 32 33 34 35 36 37 38 39 40 41 42 43 44 45 46 47 48 49 50 51 52 53 54 55 56 57 58 59 60 61 62 |
var requestRx = require('./requestRx.js'); var Rx = require('rx'); const api_key = 'AIzaSyD4e6ZUIc9G2AxKansIUKa0enFzWZy5h8w'; const url = 'https://maps.googleapis.com/maps/api/place'; const gateway = 'http://localhost:4985/db'; var SyncRequest = { syncRequest: function(city) { console.log('city to sync with %s', city); // 1. Search for Places requestRx.get(`${url}/textsearch/json?key=${api_key}&query=restaurants+in+${city}`) .subscribe((res) => { var places = JSON.parse(res.body).results; places = places.map(function (place) { place.city = city; place._id = place.place_id; delete place.place_id; return place; }); var placesStream = Rx.Observable.fromArray(places); // 2. Send the Places in bulk to Sync Gateway requestRx({uri: `${gateway}/_bulk_docs`, method: 'POST', json: {docs: places}}) .flatMap((docsRes) => { var docsStream = Rx.Observable.fromArray(docsRes.body); // Merge the place's photoreference with the doc id and rev return Rx.Observable.zip(placesStream, docsStream, (place, doc) => { return { id: doc.id, rev: doc.rev, ref: place.photos ? place.photos[0].photo_reference : 'CmRdAAAAA6MaWi5PIUhFumEYbHiM8IWHhJJvw1ss11QH1prE_x0PnUgyiyIiQmSNvfMu1lztLAA0mNdZa5Mr32ho5hE5nOKDAdOfVKcw4kLe0LKdDoYFENmRR1FE4AosTUhBvNCvEhB5HYf69MG389U27lkhrcPqGhSDbG7UhU9buWSEn2DRpy8E_R3oAg' } }); }) .flatMap((doc) => { // 3. Get the binary jpg photo using the ref property (i.e. photoreference) var options = { uri: `${url}/photo?key=${api_key}&maxwidth=400&photoreference=${doc.ref}`, encoding: null }; return requestRx.get(options) .flatMap((photo) => { // 4. Save the photo as an attachment on the corresponding document return requestRx({ uri: `${gateway}/${doc.id}/photo?rev=${doc.rev}`, method: 'PUT', headers: {'Content-Type': 'image/jpg'}, body: photo.body }) }) }) .subscribe((res) => { }); }); } }; module.exports = SyncRequest; |
Here’s what’s happening step by step:
- Get the Places that match the query restaurants in London. Use the ES 6 string interpolation feature in the url.
- The bulkdocs endpoint is very convenient for importing large datasets to a Sync Gateway instance. Read more about it in the docs.
- After saving the document, you save the photo as an attachment, you must first get the image from the Places API. Notice the encoding property is set to null. This is required by the Request module for any response body that isn’t a string. Read more about it in the Request docs.
- You must tell Sync Gateway which document (by specifying the document id) and revision of that document (by specifying the revision number) to save this attachment on.
Notice on the last line you’re exporting the SyncRequest object. In server.js, require the sync.js file and call the syncRequest method accordingly passing in the city field:
|
1 2 3 4 5 6 7 8 9 10 11 12 13 14 15 16 17 18 19 20 21 22 23 24 |
var express = require('express'); var bodyParser = require('body-parser'); var app = express(); app.use(bodyParser.json()); var sync = require('./sync'); /** * Handle the Sync Gateway webhook request. * The request body contains the document. */ app.post('/sync_request', function (req, res) { var document = req.body; console.log('Handle webhook with doc :: %s', JSON.stringify(document)); sync.syncRequest(document.city); res.sendStatus(200); }); var server = app.listen(8000, function () { var host = server.address().address; var port = server.address().port; console.log('App listening at http://%s:%s', host, port); }); |
You may have noticed that sync.js is written with the ES6 syntax. Running node server.js won’t work and you must first install the Babel module globally:
|
1 |
npm install babel-node -g |
You can now run the sync.js file independently with the following command:
|
1 |
babel-node -e "require('./sync.js').syncRequest('London')" |
Open the Admin Dashboard to monitor the documents that were saved to Sync Gateway.
http://localhost:4985/_admin/
You should now see 20 documents where each one is a place in London:

Building the Android app
In this section, you will learn how to use the Google Maps SDK on Android to get the city the user is currently located in. With that information, you will create a document of type profile to store the current city.
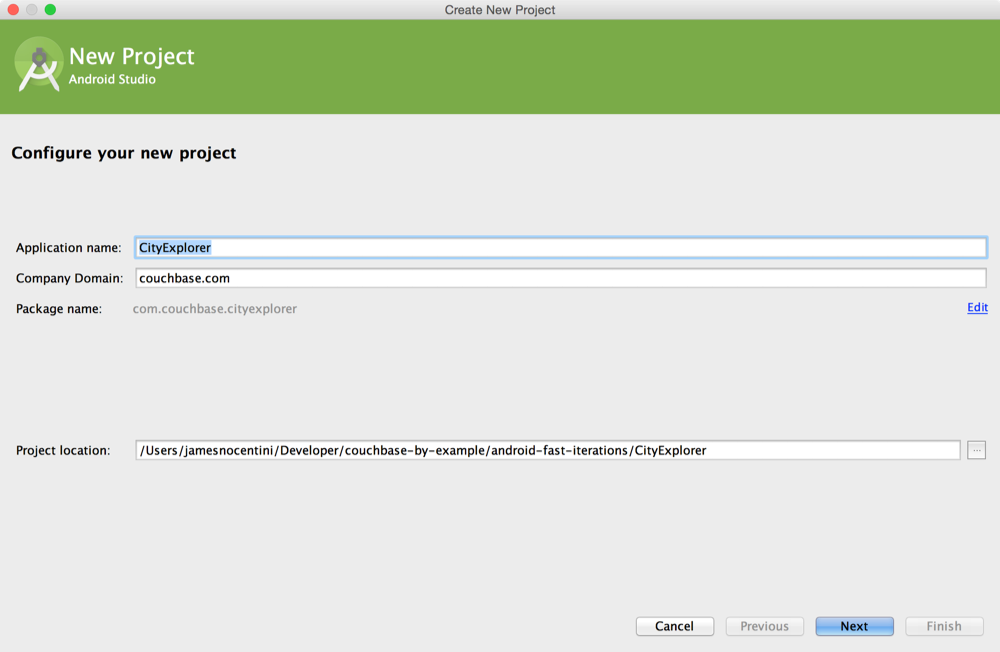
Open Android Studio and select Start a new Android Studio project from the Quick Start menu.
Name the app CityExplorer, set an appropriate company domain and project location, and then click Next:
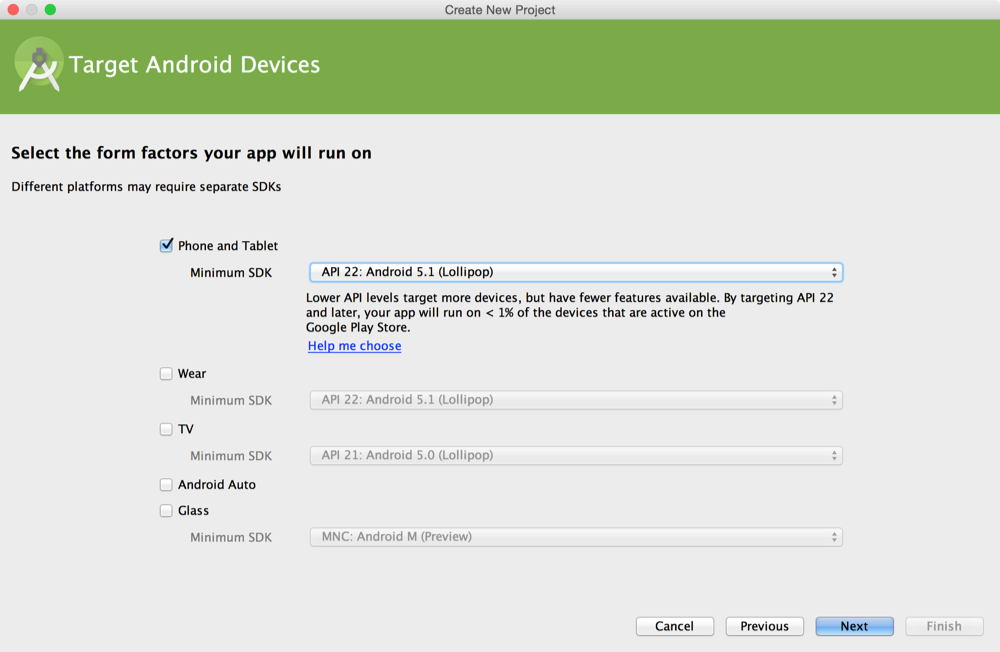
On the Target Android Devices dialog, make sure you check Phone and Tablet, set the Minimum SDK to API 22: Android 5.1 (Lollipop) for both, and click Next:
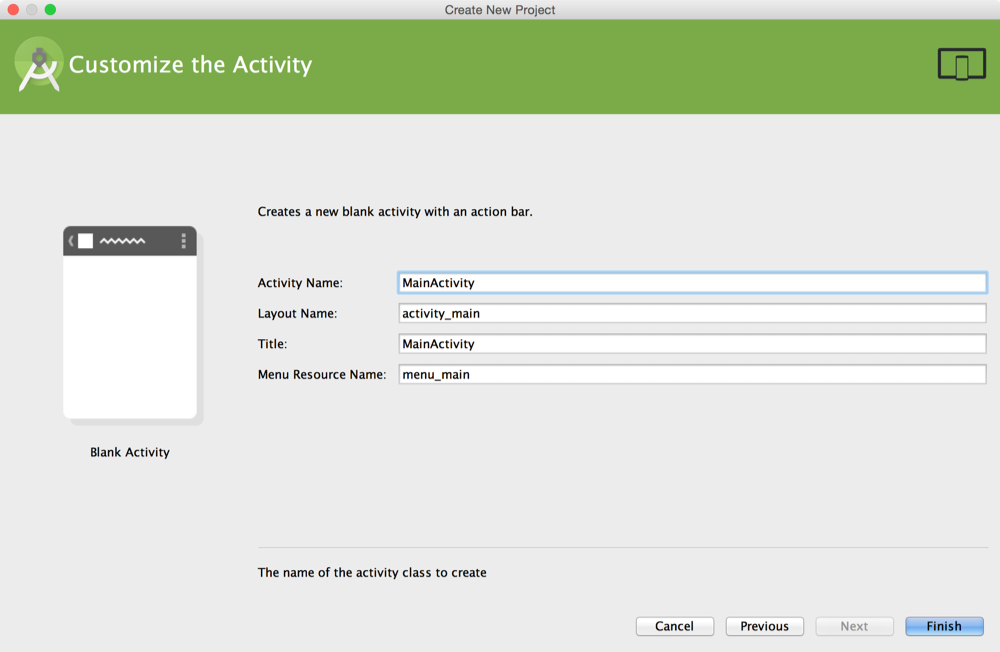
On the subsequent Add an activity to Mobile dialog, select Add Blank Activity and name the activity MainActivity:
You will use the fused location provider to retrieve the device’s last known location. In build.gradle, add the following dependency:
|
1 |
compile 'com.google.android.gms:play-services:7.5.0' |
Add a location request permission in AndroidManifest.xml in the manifest XML tag:
|
1 |
In MainActivity.java, add a new method called buildGoogleApiClient to initialise the Google API SDK and call the method in onCreate:
|
1 2 3 4 5 6 7 8 |
protected synchronized void buildGoogleApiClient() { mGoogleApiClient = new GoogleApiClient.Builder(this) .addConnectionCallbacks(this) .addOnConnectionFailedListener(this) .addApi(LocationServices.API) .build(); mGoogleApiClient.connect(); } |
Next, you will make MainActivity implement the GoogleApiClient.ConnectionCallbacks and GoogleApiClient.OnConnectionFailedListener interfaces and retrieve the location in onConnected:
|
1 2 3 4 5 |
@Override public void onConnected(Bundle bundle) { Location mLastLocation = LocationServices.FusedLocationApi.getLastLocation(mGoogleApiClient); Geocoder geocoder = new Geocoder(this, Locale.getDefault()); List |
|
1 |
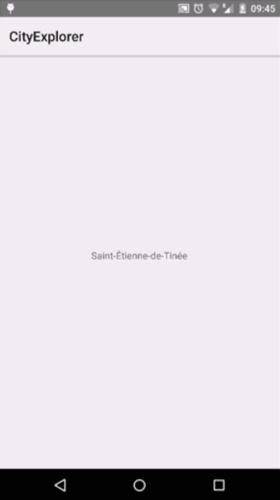
Run the application and you should see the current city displayed in the middle of the screen:
Next, you will add Couchbase Lite to your project. In build.gradle add the following:
|
1 2 3 4 5 6 7 |
// workaround for "duplicate files during packaging of APK" issue // see https://groups.google.com/d/msg/adt-dev/bl5Rc4Szpzg/wC8cylTWuIEJ packagingOptions { exclude 'META-INF/ASL2.0' exclude 'META-INF/LICENSE' exclude 'META-INF/NOTICE' } |
Add the Couchbase Lite Android package in build.gradle:
|
1 |
compile 'com.couchbase.lite:couchbase-lite-android:1.1.0' |
Create a SyncManager.java class and add the code to start a pull and push replication in continuous mode:
|
1 2 3 4 5 6 7 8 9 10 11 12 13 14 15 16 17 18 19 20 21 22 23 24 25 26 27 28 29 30 31 32 33 34 35 36 37 38 39 40 41 42 43 44 45 46 47 48 49 50 51 52 53 54 55 56 |
public class SyncManager { private static final String DATABASE_NAME = "cityexplorer"; private static final String SYNC_URL = "http://localhost:4984/db/"; private static final String CITIES_VIEW = "getCities"; private Context context; private Manager manager; private Database database; public SyncManager(Context context) { this.context = context; openDatabase(); } private void openDatabase() { try { manager = new Manager(new AndroidContext(context), Manager.DEFAULT_OPTIONS); } catch (IOException e) { e.printStackTrace(); } try { database = manager.getDatabase(DATABASE_NAME); } catch (CouchbaseLiteException e) { e.printStackTrace(); } startSync(); } private void startSync() { URL url = null; try { url = new URL(SYNC_URL); } catch (MalformedURLException e) { e.printStackTrace(); } Replication push = database.createPushReplication(url); push.setContinuous(true); push.start(); Replication pull = database.createPullReplication(url); pull.setContinuous(true); pull.start(); } public Database getDatabase() { return database; } public void setDatabase(Database database) { this.database = database; } } |
Run the app and take a look in LogCat, you should see the replication was successfull. But there’s no way to query the documents that were synced so far. To do so, you will use a Couchbase View that will index documents by their city property.
In SyncManager.java, add the following method:
|
1 2 3 4 5 6 7 8 9 10 11 12 13 14 15 16 17 18 19 20 21 22 23 24 25 26 27 28 29 30 31 32 33 |
private void registerViews() { View citiesView = database.getView(CITIES_VIEW); citiesView.setMapReduce(new Mapper() { @Override public void map(Map<String, Object> document, Emitter emitter) { if (document.get("name") != null) { List<object width="300" height="150"> key = new ArrayList<object>(); key.add(document.get("city")); emitter.emit(key, null); } } }, new Reducer() { @Override public Object reduce(List<object> keys, List<object> values, boolean rereduce) { return new Integer(values.size()); } }, "7"); } To query that view, add another method called <strong>queryCities</strong> like so: <pre> private void queryCities() { Query query = database.getView(CITIES_VIEW).createQuery(); query.setGroupLevel(1); try { QueryEnumerator enumeration = query.run(); for (QueryRow row : enumeration) { System.out.println("Row is " + row.getValue() + " and key " + row.getKey()); } } catch (CouchbaseLiteException e) { e.printStackTrace(); } } |
And call it after registerViews in the openDatabase method.Run the app and you should see the number of places in each city in LogCat: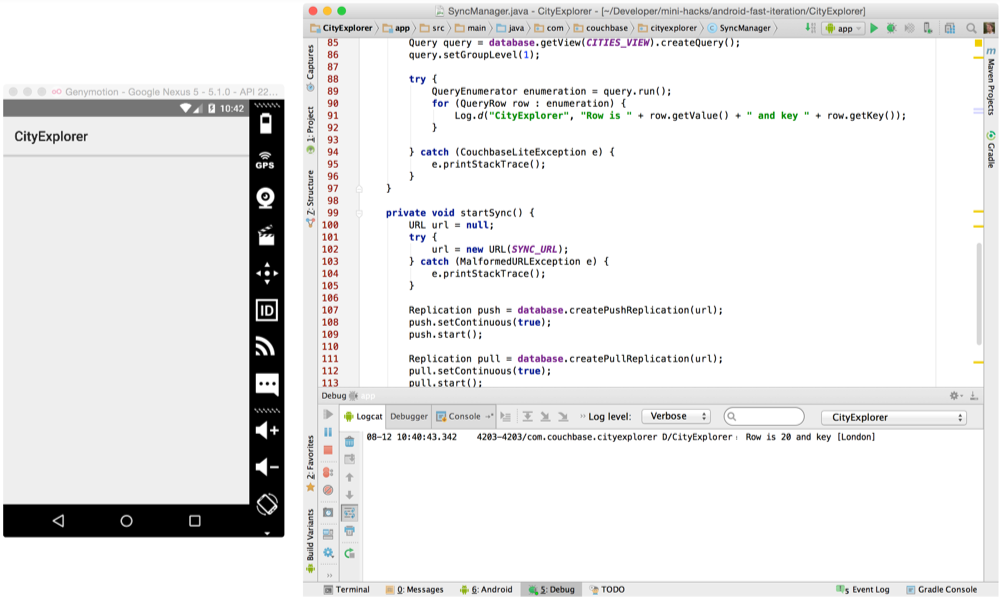 You have set up the push replication as well but haven’t persisted any document locally yet. In the
 onConnected method of MainActivity.java you will add code to persist a new document locally with a type property equal to profile and city property with the city name returned by the fused location api.Before running the app let’s recap the different components of this architecture: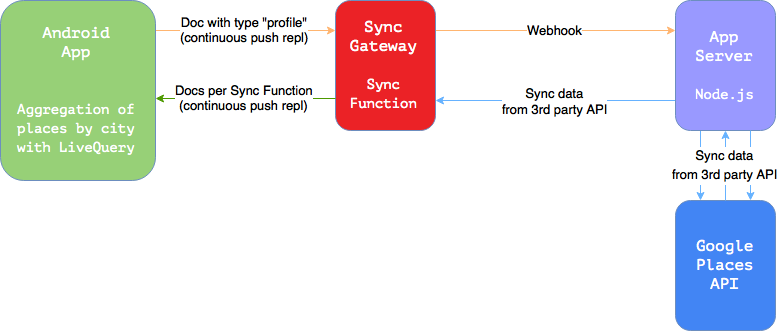 Notice the arrows are grouped by color:
- Orange: When a user opens the app, the profile document is persisted locally and sent to Sync Gateway via the continuous push replication and triggers a webhook.
- Blue: The App Server handles the webhooks and imports the places for the particular city into Sync Gateway.
- Green: The appropriate user receives the documents per the access rules defined in the Sync Function.
The Green event will always happen some time after the app was opened. It would be good to monitor the cities query in the Android app to monitor the data as it’s pulled from Sync Gateway. You will do so using a LiveQuery in place of a Query. Update the queryCities method to the following:
|
1 2 3 4 5 6 7 8 9 10 11 12 13 14 15 16 17 18 19 |
private void queryCities() { final Query query = database.getView(CITIES_VIEW).createQuery(); query.setGroupLevel(1); LiveQuery liveQuery = query.toLiveQuery(); liveQuery.addChangeListener(new LiveQuery.ChangeListener() { @Override public void changed(LiveQuery.ChangeEvent event) { try { QueryEnumerator enumeration = query.run(); for (QueryRow row : enumeration) { Log.d("CityExplorer", "Row is " + row.getValue() + " and key " + row.getKey()); } } catch (CouchbaseLiteException e) { e.printStackTrace(); } } }); liveQuery.start(); } |
So far you should have 20 documents in Sync Gateway and you can check that on the Admin Dashboard. Restart the application and this will create the profile document, send it to Sync Gateway to import 20 places around the user’s location. This will result in adding 20 new places to Sync Gateway:
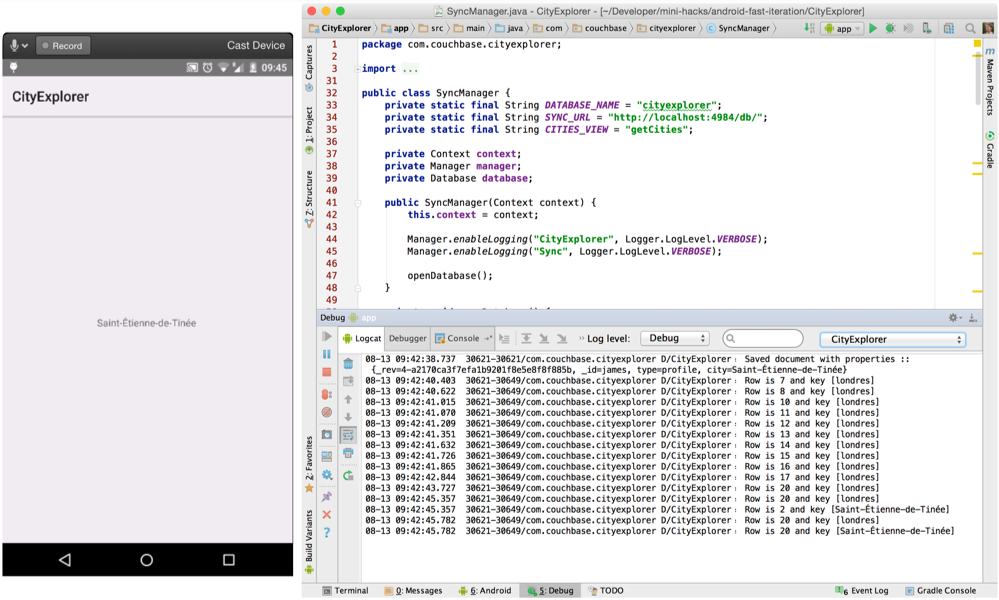 Notice that the Sync Gateway now has 41 documents (the profile document and 20 more places in the location of the device running the app) and the LiveQuery in the Android app returns the same documents by city (in this example 20 in London and 20 in Saint-Étienne-de-Tinée).
Changing the Sync Function
So far you have been following the tutorial without creating users. That is, all mobile devices connecting to Sync Gateway receive the same documents. This isn’t manageable as the size of the data grows. Furthermore, if a user is located in Saint-Étienne-de-Tinée, there’s no need to sync places in London to it’s device. To add this filtering of documents per device you will do two things:
- Create users and authenticate as a particular user.
- Update the Sync Function to give a particular user access to the documents in the city it is located in.
To create a user you will use curl to send a POST request on the admin port:
|
1 2 3 |
$ curl -vX POST :4985/db/_user/ -H 'Content-Type: application/json' -d '{"name": "james", "password": "letmein"}' |
In the Android app, update the startSync method in SyncManager.java with the basic authenticator passing in the same credentials:
|
1 2 3 4 5 6 7 8 9 10 11 12 13 14 15 16 17 18 19 |
private void startSync() { URL url = null; try { url = new URL(SYNC_URL); } catch (MalformedURLException e) { e.printStackTrace(); } Authenticator authenticator = new BasicAuthenticator("james", "letmein"); Replication push = database.createPushReplication(url); push.setContinuous(true); push.setAuthenticator(authenticator); push.start(); Replication pull = database.createPullReplication(url); pull.setContinuous(true); pull.setAuthenticator(authenticator); pull.start(); } |
Navigate to the Sync tab in the Admin Dashboard:http://localhost:4985/_admin/db/db/syncUpdate the Sync Function with the following:
|
1 2 3 4 5 6 7 8 |
function(doc, oldDoc) { if (doc.type == "profile") { channel(doc.city); access(doc._id, doc.city); } else if (doc.type == "city") { channel(doc.city); } } |
Then click on the Live Preview Mode button and the top banner should turn yellow.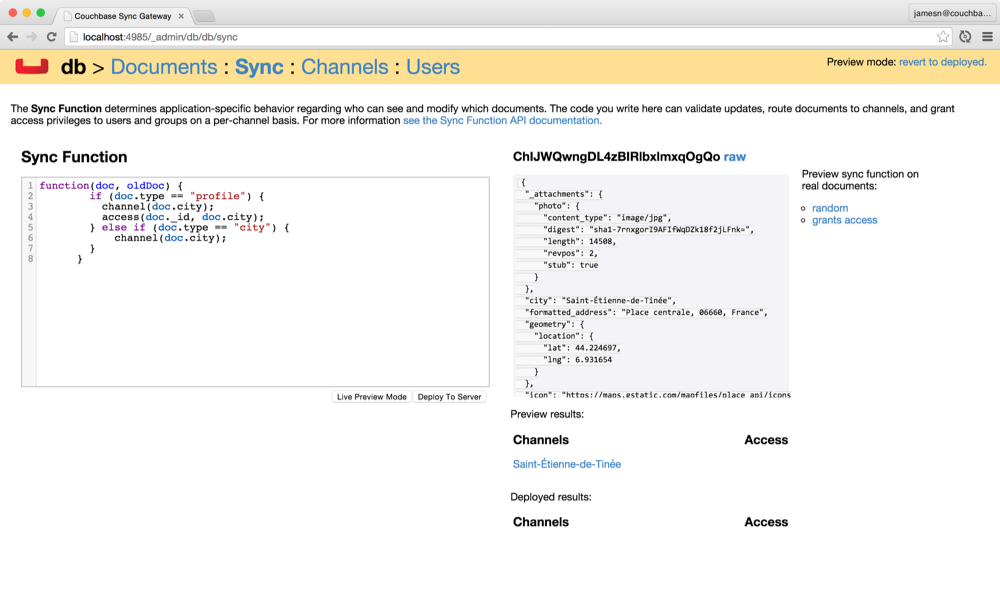 This means that you can test the Sync Function on random documents but nothing is deployed yet, this is just for testing the result. Use the random button to see the channel/access output given a random document as input:
 To actually deploy this new Sync Function, it’s best practice to stop Sync Gateway, update the config file and start it again.Once you have restarted Sync Gateway, uninstall the app from the device and run it again. You should notice the same 40 documents being replicated. Indeed, you have updated the Sync Function but the documents that were persisted so far haven’t had a chance to run through the new Sync Function. To fix this, you will use the resync operation in the following section.
Resync
Any time you modify the Sync Function, make sure to call the _resync endpoint to re-calculate the channel access rules for all existing documents in the database:
|
1 |
$ curl -vX POST http://localhost:4985/db/_resync |
Delete the app and restart it. This time, you will see only the 20 places in LogCat because the user is located in Saint-Étienne-de-Tinée and that user doesn’t have access to the London channel and thus will not pull those documents.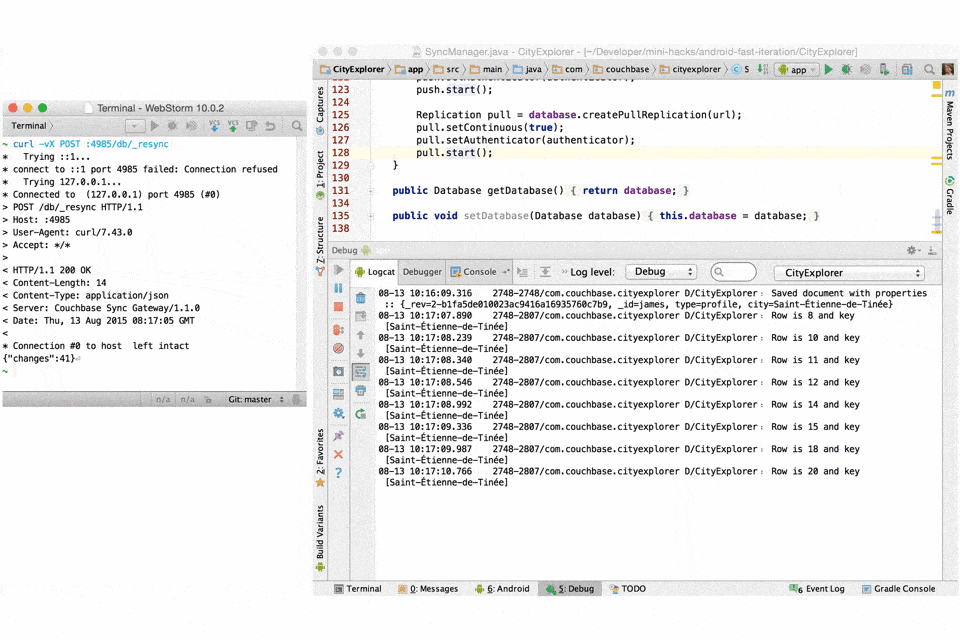
Conclusion
In this tutorial, you learnt how to use a webhook to import documents from a 3rd party API to Sync Gateway using an App Server. You also used the resync endpoint upon changing your Sync Function to update the access to channels.