
The Couchbase Autonomous Operator enables you to run Couchbase deployments natively on Open Source Kubernetes or Enterprise Red Hat OpenShift Container Platform. I’m excited to announce the availability of the Couchbase Autonomous Operator 0.8 Beta Refresh today!
Running and managing a Couchbase cluster just got a lot easier with the introduction of the Couchbase Autonomous Operator for Kubernetes. Users can now deploy Couchbase on top of Kubernetes and have the Couchbase Autonomous Operator handle much of the cluster management, such as failure recovery and multidimensional scaling. However, users may feel a bit uncomfortable just sitting back and watching the Couchbase Autonomous Operator do its thing. To alleviate some of their worry, this three-part blog series will walk through the different ways the Quality Engineering team here at Couchbase gives our customers peace of mind when running Couchbase on Kubernetes.
This blog series will highlight three types of testing we do for Couchbase on Kubernetes. The first post in the series will focus on manual testing. The second post will be all about testing the Couchbase Autonomous Operator. And the third post will show our users how to test the Couchbase instances themselves with testrunner, our functional test suite.
Phase 1: Manual Certification of the Couchbase Autonomous Operator
Manual testing is often boring compared to the thrills of automated testing, but with Kubernetes it can actually be quite fun. In this post we will walk through setting up the Couchbase travel-sample app with an operator-managed Couchbase cluster as the datastore, all on Kubernetes. Once the application and cluster are all set up on Kubernetes, we will test some scaling and failure scenarios.
In the following sections, we will cover:
0: Prerequisites and Setup
1: Cluster Deployment
2: Cluster Configuration
3: Application Deployment
4: Verification
Prerequisites and Setup:
To set up that travel-sample app using Couchbase on Kubernetes, we will use minikube. Instructions for setting up minikube can be found here: https://kubernetes.io/docs/getting-started-guides/minikube/.
Once minikube is set up, you may want to increase the memory and CPU count. You will need to bring up the Kubernetes dashboard to monitor the cluster using: minikube dashboard
Cluster Deployment:
After setting up minikube, we will need to initialize the Couchbase Autonomous Operator and the Couchbase cluster that the operator will manage. The following YAML file will tell the Kubernetes master to create a Couchbase Autonomous Operator deployment:
|
1 2 3 4 5 6 7 8 9 10 11 12 13 14 15 16 17 18 19 20 21 22 23 24 25 26 27 28 29 30 31 32 33 34 35 |
deployment.yaml --- apiVersion: extensions/v1beta1 kind: Deployment metadata: name: couchbase-operator spec: replicas: 1 template: metadata: labels: name: couchbase-operator spec: containers: - name: couchbase-operator image: couchbase/k8s-operator:0.8.0-beta env: - name: MY_POD_NAMESPACE valueFrom: fieldRef: fieldPath: metadata.namespace - name: MY_POD_NAME valueFrom: fieldRef: fieldPath: metadata.name ports: - name: readiness-port containerPort: 8080 readinessProbe: httpGet: path: /readyz port: readiness-port initialDelaySeconds: 3 periodSeconds: 3 failureThreshold: 19 |
Create a file called deployment.yaml and submit this YAML to Kubernetes with: kubectl create -f path/to/deployment.yaml. After a couple of seconds the operator deployment should show up in the Kubernetes dashboard.
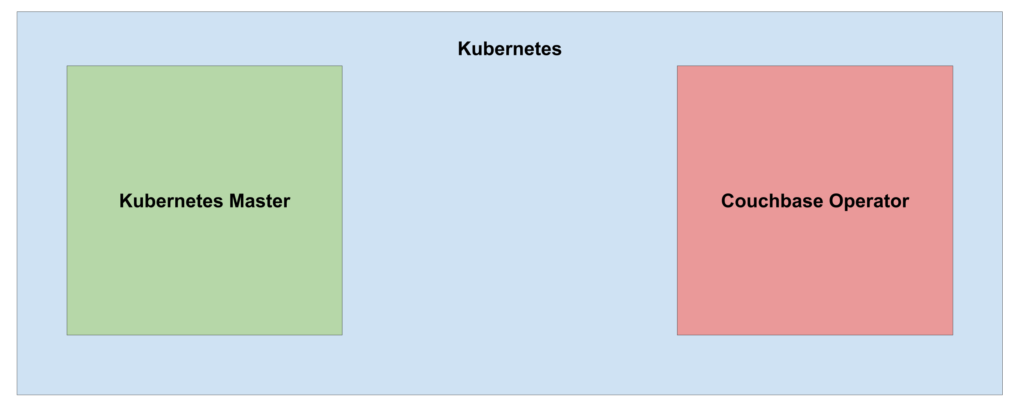
Figure 1: State of the Kubernetes cluster after deploying the Couchbase Autonomous Operator.
Next, a secret must be provided to Kubernetes so that the Couchbase Autonomous Operator can manage the Couchbase nodes.
|
1 2 3 4 5 6 7 8 9 10 |
secret.yaml --- apiVersion: v1 kind: Secret metadata: name: cb-example-auth type: Opaque data: username: QWRtaW5pc3RyYXRvcg== password: cGFzc3dvcmQ= |
Create a file called secret.yaml and send the secret to Kubernetes with the following: kubectl create -f path/to/secret.yaml.
Next, let’s bring up a cluster of 2 Couchbase nodes. The following YAML specifies a cluster with two nodes, two buckets (default and travel-sample), and all services enabled:
|
1 2 3 4 5 6 7 8 9 10 11 12 13 14 15 16 17 18 19 20 21 22 23 24 25 26 27 28 29 30 31 32 33 34 35 36 37 38 39 40 41 42 43 44 45 46 47 |
cb-cluster.yaml --- apiVersion: couchbase.database.couchbase.com/v1beta1 kind: CouchbaseCluster metadata: name: cb-example spec: baseImage: couchbase/server version: enterprise-5.0.1 authSecret: cb-example-auth exposeAdminConsole: true paused: false cluster: dataServiceMemoryQuota: 256 indexServiceMemoryQuota: 256 searchServiceMemoryQuota: 256 indexStorageSetting: memory_optimized autoFailoverTimeout: 10 buckets: - name: default type: couchbase memoryQuota: 128 replicas: 1 ioPriority: high evictionPolicy: fullEviction conflictResolution: seqno enableFlush: true enableIndexReplica: false - name: travel-sample type: couchbase memoryQuota: 128 replicas: 1 ioPriority: high evictionPolicy: fullEviction conflictResolution: seqno enableFlush: true enableIndexReplica: false servers: - size: 2 name: all_services services: - data - index - query - search dataPath: /opt/couchbase/var/lib/couchbase/data indexPath: /opt/couchbase/var/lib/couchbase/data |
Submit the cluster configuration with: kubectl create -f path/to/cb-cluster.yaml.
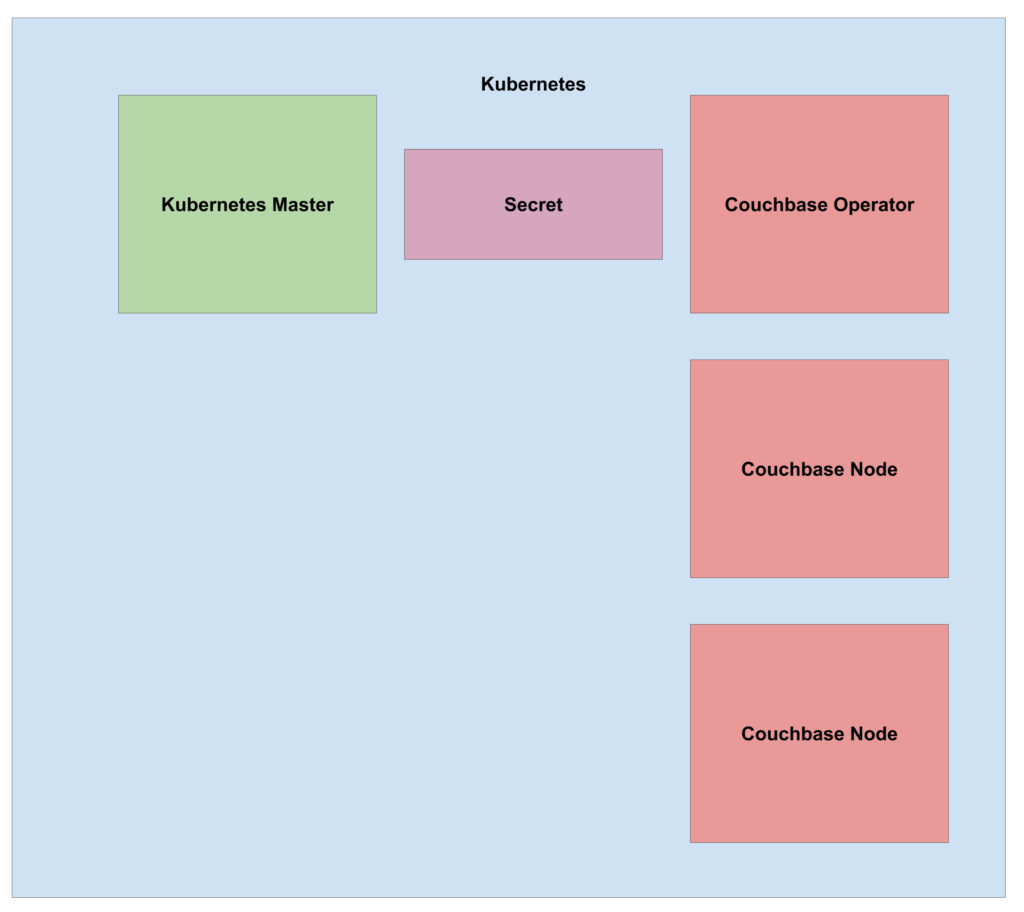
Figure 2: State of the Kubernetes cluster after scaling up to 2 Couchbase nodes.
Cluster Configuration:
Now that we have the a two node cluster managed by the Couchbase Autonomous Operator, updates to the cluster configuration should be made in the cb-cluster.yaml file and resubmitted to Kubernetes. Should any changes be made manually through the Couchbase UI, the operator will take action to re-align the cluster to the configuration specified in cb-cluster.yaml. To make changes to the cluster, first make the changes in cb-cluster.yaml, then update Kubernetes with: kubectl apply -f path/to/cb-cluster.yaml
The next step is to load the travel-sample data and index definitions into the cluster’s travel-sample bucket. The following command will call cbimport on pod cb-example-0000: kubectl exec pod cb-example-0000 -ti /opt/couchbase/bin/cbimport json -c 127.0.0.1:8091 -u Administrator -p password -b travel-sample -f sample -d /opt/couchbase/samples/travel-sample.zip
Application Deployment:
The cluster is all set up now, but the travel-sample app is not. Now, we need to build a docker image that Kubernetes will use for the app. The dockerfile below will pull down the travel-sample app from my fork in github, https://github.com/korry8911/try-cb-python, and install all dependencies. The travel.py file has been modified for this blog post to use the Kubernetes python client to grab the IPs of the running Couchbase nodes in the same Kubernetes namespace.
|
1 2 3 4 5 6 7 8 9 10 11 12 |
#travel.py (modified) #https://github.com/korry8911/try-cb-python/blob/master/travel.py#L20 config.load_incluster_config() v1 = client.CoreV1Api() print("Finding Couchbase Nodes:") ret = v1.list_pod_for_all_namespaces(watch=False) cbip = [] for i in ret.items: print("%s\t%s\t%s" % (i.status.pod_ip, i.metadata.namespace, i.metadata.name)) if 'cb-example' in i.metadata.name: cbip.append(i.status.pod_ip) |
|
1 2 3 4 5 6 7 8 9 10 11 12 13 14 15 16 17 18 19 20 21 22 23 24 25 26 27 28 29 30 31 32 33 34 35 36 |
#Dockerfile FROM ubuntu:14.04 RUN apt-get update RUN apt-get install -y gcc g++ make cmake git-core libevent-dev libev-dev libssl-dev libffi-dev psmisc iptables zip unzip python-dev python-pip vim curl # build libcouchbase RUN git clone git://github.com/couchbase/libcouchbase.git && \ mkdir libcouchbase/build WORKDIR libcouchbase/build RUN ../cmake/configure --prefix=/usr && \ make && \ make install WORKDIR / RUN git clone https://github.com/korry8911/try-cb-python.git WORKDIR try-cb-python ARG BRANCH=5.0 RUN git checkout $BRANCH RUN cat travel.py # install python deps RUN pip2 install --upgrade packaging appdirs RUN pip install -U pip setuptools RUN pip install paramiko &&\ pip install gevent &&\ pip install boto &&\ pip install httplib2 &&\ pip install pyyaml &&\ pip install couchbase RUN pip install -r requirements.txt COPY entrypoint.sh entrypoint.sh RUN chmod +x ./entrypoint.sh ENTRYPOINT ["sh", "entrypoint.sh"] |
|
1 2 3 4 |
#entrypoint.sh #!/bin/bash python travel.py while true; do sleep 1000; done |
Build the travel-sample app docker image with: docker build -t your-dockerhub-handle/travel-sample:latest. The docker image needs to be loaded on to the Kubernetes worker node. Easiest way to do that is pulling the image from dockerhub. Push the travel-sample image with: docker push your-dockerhub-handle/travel-sample:latest.
The travel-sample app configuration is defined in the following file. Make sure to add your docker handle.
|
1 2 3 4 5 6 7 8 9 10 11 12 13 14 15 16 |
travel-sample.yaml --- apiVersion: extensions/v1beta1 kind: Deployment metadata: name: travel-sample spec: replicas: 1 template: metadata: labels: name: travel-sample spec: containers: - name: travel-sample image: your-dockerhub-handle/travel-sample:latest |
Load the travel-sample app with: kubectl create -f path/to/travel-sample.yaml.
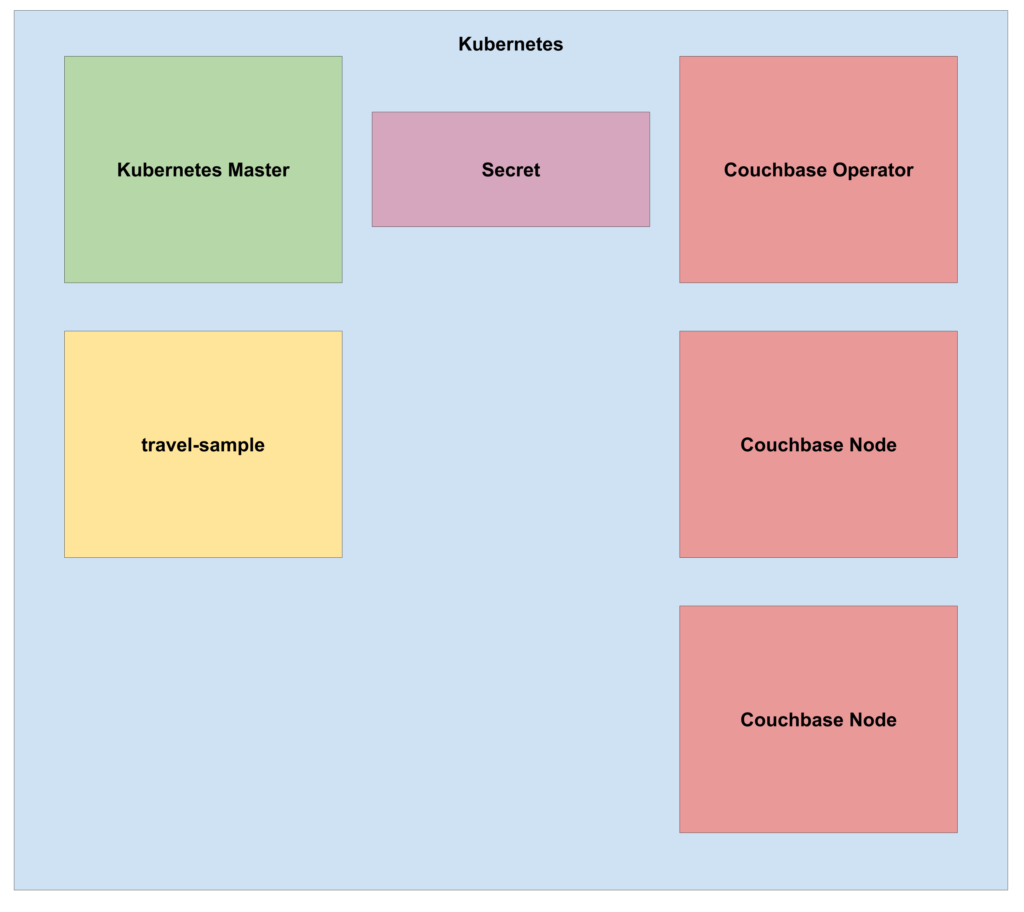
Figure 3: State of the Kubernetes cluster after deploying the travel-sample app.
Kubernetes, by default, does not allow access to pods from outside the cluster. Therefore, to reach the travel-sample app, a node-port service must be created to proxy the port on which the travel-sample app listens for incoming requests.
|
1 2 3 4 5 6 7 8 9 10 11 12 13 |
nodeport.yaml --- kind: Service apiVersion: v1 metadata: name: travelsample spec: type: NodePort ports: - port: 8080 nodePort: 32000 selector: name: travelsample |
Create the node-port service for the travel-sample with: kubectl create -f path/to/nodeport.yaml.
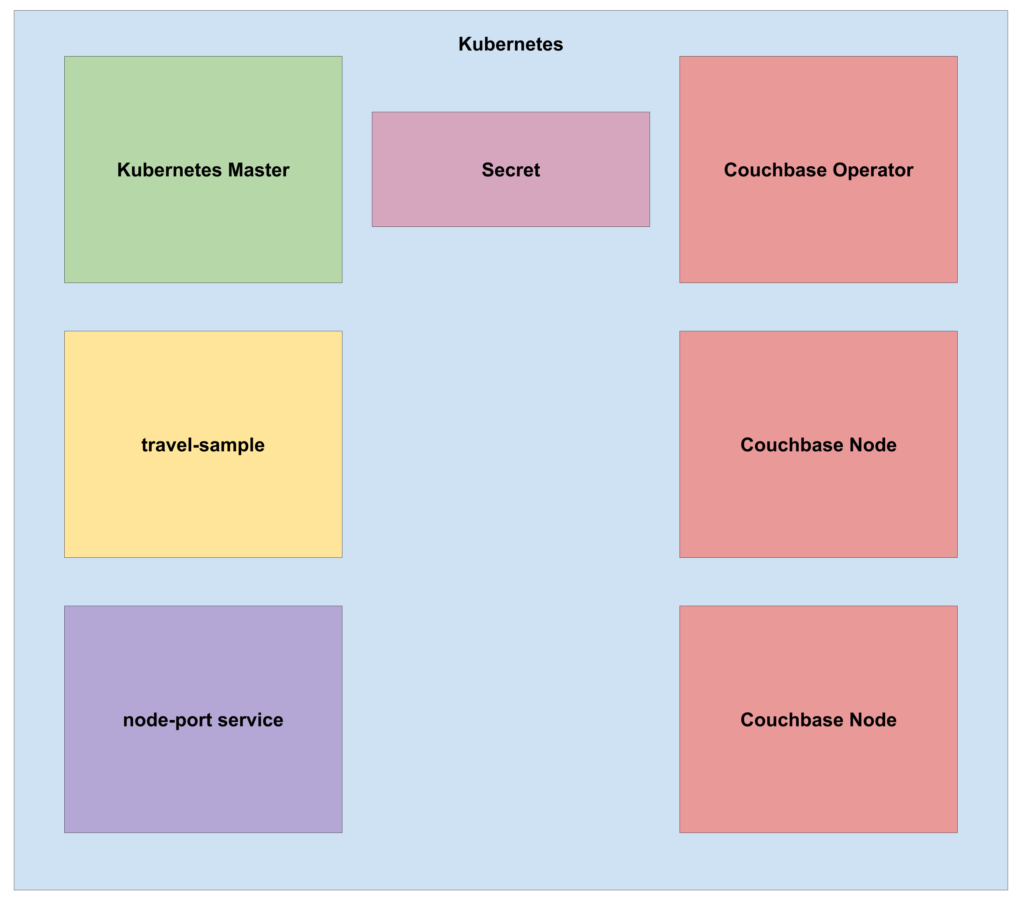
Figure 4: State of the Kubernetes cluster after adding a node-port service.
Since we are running the application on minikube, we must access the travel-sample app by running: minikube service travelsample.
Verification:
Now that we have played around with the travel-sample app, lets scale up the Couchbase cluster by one node. To do so, change the size parameter in the server section of the cb-cluster.yaml file from 2 to 3. Then, submit the changes to Kubernetes with: kubectl apply -f path/to/cb-cluster.yaml.
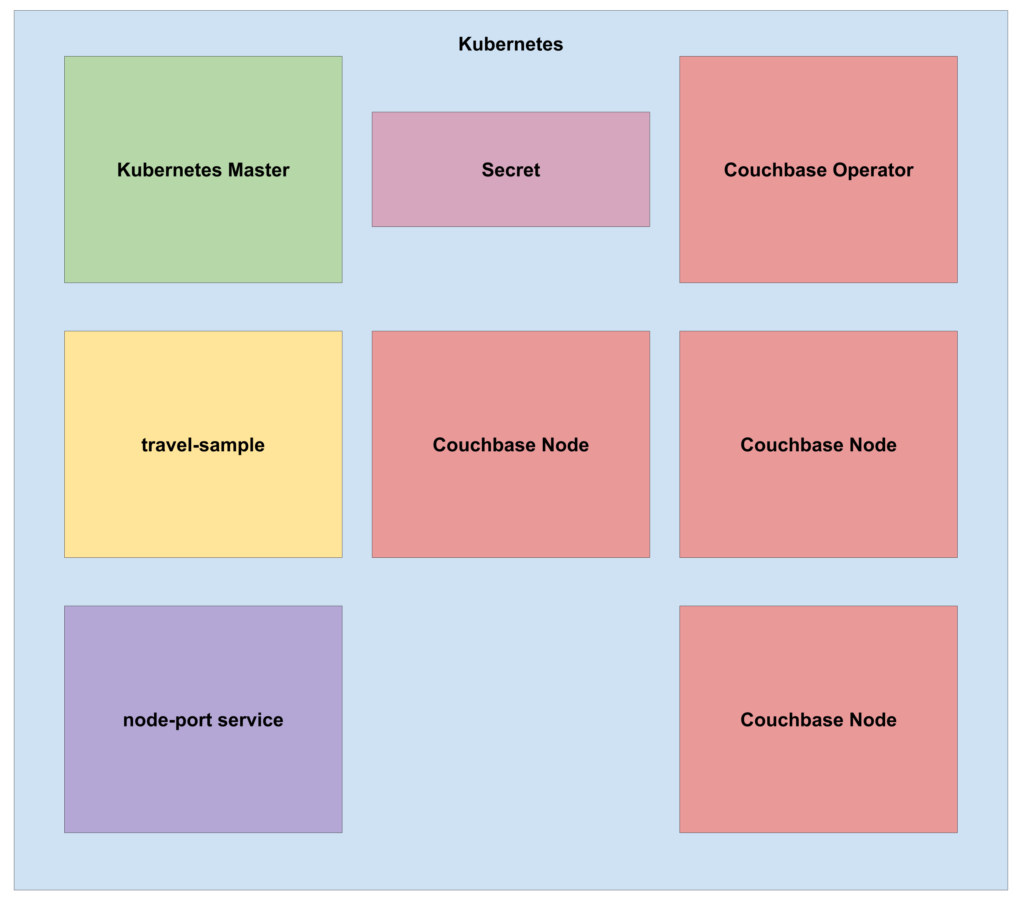
Figure 5: State of the Kubernetes cluster after scaling up to 3 Couchbase nodes.
The Couchbase cluster is now 3 nodes, which is enough nodes to test the Couchbase Autonomous Operators autofailover feature. Let’s kill one Couchbase node to simulate a failure scenario and watch the Couchbase Autonomous Operator automatically rebalance a new node back into the cluster. Kill one Couchbase pod by navigating to Pods in the Kubernetes dashboard and deleting the cb-example-0002 pod.
After the autofailover timeout period of 10 seconds, the Couchbase Autonomous Operator will eject the failed node from the cluster, initialize a new node, and rebalance the node into the cluster. Throughout this process, users can play with the travel-sample app without any service interruption
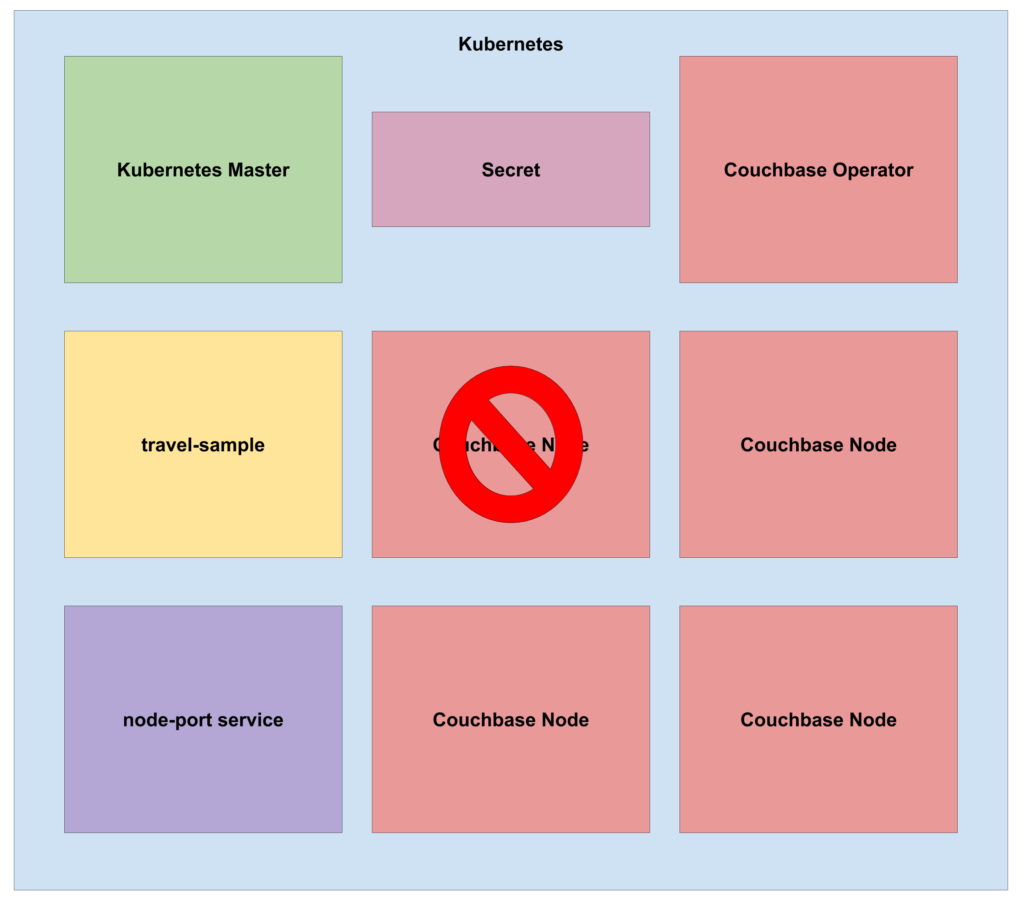
Figure 6: State of the Kubernetes cluster after recovery from a Couchbase node failure.
Conclusion:
The Couchbase Autonomous Operator takes a lot of the hassle out of running a Couchbase cluster in Open Source Kubernetes and/or Enterprise Red Hat OpenShift Container Platform. The desired state of the cluster is maintained automatically even in the face of node failure. Manual certification of the node recovery feature is fun but more testing is required. In the next, post we will go through, in-depth, our functional testing approach for other features of the Couchbase Autonomous Operator.
Ready to check out the Beta?
- It is easy to get your hands on the beta by following steps under Prerequisites and Setup to deploy Couchbase Operator on Kubernetes or OpenShift platform.
- Link to Dockerfile
- Couchbase Server – https://hub.docker.com/_/couchbase/
- Couchbase Operator – https://hub.docker.com/r/couchbase/k8s-operator/
If you have any questions, comments, or additional feedback, leave a comment below or post on https://www.couchbase.com/forums/.