
With Couchbase Server 6.5.1. we now standardize the non-root install and upgrade for rpm packages. This will now allow you to easily install, upgrade and maintain Couchbase Server as non-root.
The purpose of this blog is not to replace our excellent Couchbase documentation, but rather, to reiterate some best practices for a successful installation. This blog is divided into 2 parts.
Part 1: Install Couchbase Server 6.5.1 as non-root.
Part 2: Upgrade a non-root installed Couchbase Server 6.0.4 to version 6.5.1.
What’s new in Couchbase Server 6.5.1
Install: A new installer cb-non-package-installer, is used to install the Couchbase server as opposed to using rpm2cpio and reloc.sh.
Status: Now you can check the status of the Couchbase server with a new command, couchbase-server –status
Upgrade: The cb-non-package-installer is used to upgrade the Couchbase server from the previous version. All upgrade options, including Rolling Online Upgrade with Graceful Failover and Delta Recovery are supported.
Part 1: New install
Plan
- Deploy a 3 node Couchbase 6.5.1 cluster as non-root
- The user will be: ec2-user
- The Server will be deployed in: /home/ec2-user/cb-server
- The Data will be in: /home/ec2-user/cb-data
Pre-requisites
There are a few Common Errors which you may run into when running Couchbase server as non-root and the linked document describes them. For example: ulimits. Ulimit is the number of open file descriptors per process. The standard root installer changes these during installation, but for non-root, you have to take care of these yourself. So, let me highlight a few here since these are very important.
Disable Transparent Huge Pages (THP)
Transparent huge pages (THP) is a memory management system that is enabled by default in most Linux operating systems. THP must be disabled in order for Couchbase Server to function correctly on Linux. Please follow the documentation and ensure that THP has been disabled.
Configure Kernel Swappiness
On Linux, the kernel’s swappiness level indicates how likely the system is to swap pages out of physical memory based on RAM usage. Swappiness should be set to 1 or 0 on most Linux systems to achieve optimal Couchbase Server performance. Please follow the documentation and ensure that Swappiness has been set as per recommendation.
Check the ulimits
A quick check of ulimits for the ec2-user. These are the minimum recommended values. Make these permanent.
|
1 2 3 4 5 |
[ec2-user@ip-172-31-22-131 ~]$ ulimit -n 70000 [ec2-user@ip-172-31-22-131 ~]$ ulimit -c unlimited |
Install required programs
We need python2, bzip2 and perl. So, make sure that these are all available
|
1 2 3 4 5 6 7 8 9 |
[ec2-user@ip-172-31-22-131 ~]$ python2 -V Python 2.7.16 [ec2-user@ip-172-31-22-131 ~]$ bzip2 -V bzip2, a block-sorting file compressor; Version 1.0.6, 6-Sept-2010. [ec2-user@ip-172-31-22-131 ~]$ perl -v This is perl 5, version 26, subversion 3 (v5.26.3) built for x86_64-linux-thread-multi (with 51 registered patches, see perl -V for more detail) |
Download the packages
|
1 2 3 |
[ec2-user@ip-172-31-22-131 ~]$ wget https://packages.couchbase.com/releases/6.5.1/couchbase-server-enterprise-6.5.1-centos8.x86_64.rpm [ec2-user@ip-172-31-22-131 ~]$ wget https://packages.couchbase.com/cb-non-package-installer/cb-non-package-installer |
Install Couchbase Server as non-root
SSH into the first node to install.
Step 1: Create the directories for the Server and Data
|
1 2 3 4 |
[ec2-user@ip-172-31-22-131 ~]$ ls -l total 346696 drwxrwx---. 3 ec2-user ec2-user 21 Apr 24 18:03 cb-data drwxrwxr-x. 2 ec2-user ec2-user 6 Apr 24 18:03 cb-server |
Step 2: Install the Couchbase Server
|
1 2 |
[ec2-user@ip-172-31-22-131 ~]$ ./cb-non-package-installer --install --install-location /home/ec2-user/cb-server --package couchbase-server-enterprise-6.5.1-centos8.x86_64.rpm Successfully installed |
Step 3: Start the Couchbase Server
|
1 2 3 4 5 6 7 8 9 10 11 12 |
/home/ec2-user/cb-server/opt/couchbase/bin/couchbase-server \-- -noinput -detached The maximum number of processes for the couchbase user is set too low (4096). It must be at least 10000. Normally this can be increased by adding the following lines to /etc/security/limits.conf: couchbase <value> couchbase <value> Where <value> is greater than 10000. The procedure may be totally different if you're running so called "non-root/non-sudo install" or if you've built Couchbase Server from source. |
You can ignore that message since we have already set the ulimits for ec2-user.
Step 4: Check the status
|
1 2 |
[ec2-user@ip-172-31-22-131 ~]$ /home/ec2-user/cb-server/opt/couchbase/bin/couchbase-server --status Couchbase Server is running |
Repeat above steps for the other 2 nodes
Setup the Couchbase Cluster
Access: http://xxxx.compute.amazonaws.com:8091
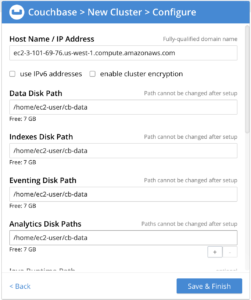
Note the changes to the various Data Paths.
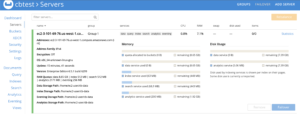
Check the 1 node cluster
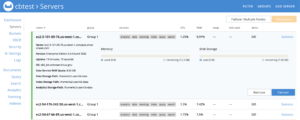
Add remaining nodes
Click on ADD SERVER from the above screen, add the other 2 nodes and Rebalance. When adding, do check the custom data paths in the Add Server screen.
 Cluster is now up and running
Part 2: Upgrade
Pre-upgrade
I start with a 3 node Couchbase Server 6.0.4 installed as ec2-user.
The installation home is: /home/ec2-user/cb-server
The data directory is: /home/ec2-user/cb-data
Lets check the Couchbase Server status by logging into Couchbase 6.0.4 Admin UI and make sure they are all Green.
 Next, a quick check of the buckets shows:

Now, let’s upgrade this cluster to Couchbase 6.5.1.
Pre-requisites
This is the same as described in Part 1 of this blog. Please make sure of meeting these pre-requisites even if these have not been done when you installed Couchbase Server 6.0.4. The upgrade process is a good opportunity to do this.
Upgrade Process
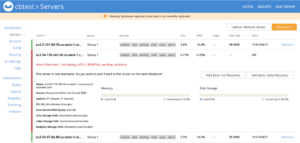
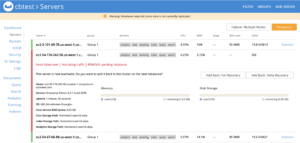
Step 1: Gracefully Failover a node
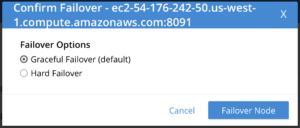
Notes
- Do not Rebalance yet
- The node is Failed over and not taking any traffic, but is still part of the cluster
A quick check of the node
SSH into the failed over node and perform these steps.
Step 2: Stop the server
|
1 |
[ec2-user@ip-172-31-25-239 ~]$ /home/ec2-user/cb-server/opt/couchbase/bin/couchbase-server -k |
Step 3: Upgrade the server
|
1 2 3 4 |
[ec2-user@ip-172-31-25-239 ~]$ ./cb-non-package-installer --upgrade --install-location \ /home/ec2-user/cb-server --package couchbase-server-enterprise-6.5.1-centos8.x86_64.rpm Running cbupgrade this could take some time Upgrade has completed successfully |
Step 4: Start the server
|
1 |
[ec2-user@ip-172-31-25-239 ~]$ /home/ec2-user/cb-server/opt/couchbase/bin/couchbase-server \-- -noinput -detached |
Tip: In any of the steps, you can check the server status by:
|
1 |
[ec2-user@ip-172-31-25-239 ~]$ /home/ec2-user/cb-server/opt/couchbase/bin/couchbase-server --status |
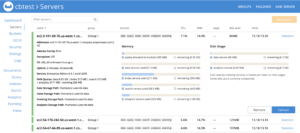
Check the server version in the UI, post upgrade
Note the change in the Server Version.
Add the node back and Rebalance
Note: We will be performing Rolling Online Upgrade with Graceful Failover and Delta Recovery.
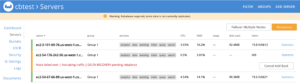
Click the Add Back: Delta Recovery button.
Optional: Check the Log
|
1 |
Starting rebalance, KeepNodes = ['ns_1@ec2-3-101-69-76.us-west-1.compute.amazonaws.com', 'ns_1@ec2-54-176-242-50.us-west-1.compute.amazonaws.com', 'ns_1@ec2-54-67-66-89.us-west-1.compute.amazonaws.com'], EjectNodes = [], Failed over and being ejected nodes = [], Delta recovery nodes = ['ns_1@ec2-54-176-242-50.us-west-1.compute.amazonaws.com'], Delta recovery buckets = all; Operation Id = 1651aa843a095465bbb5b38dd22a1adans_orchestrator 000ns_1@ec2-54-176-242-50.us-west-1.compute.amazonaws.com1:00:44 AM Fri Apr 24, 2020 |
Complete full upgrade
Repeat the same process for all 3 nodes.To Failover the first node, which you were logging into the Admin UI, you will need to access the Admin UI from a upgraded node. The look and feel has been made better, but the functionality is the same.
Conclusion
After the completion of the upgrade process, check the Dashboard for the Server version:
![]()
The upgrade is complete.