
ASP.NET Core Kubernetes tutorial will be covered in this blog post, as a follow-up to ASP.NET Core Microservices: Getting Started.
I just saw this and it made me laugh WAY HARDER than it probably should have. pic.twitter.com/R1wleGZM0B
— Carmen Crincoli – @crincoli.org (@CarmenCrincoli) August 6, 2019
In that previous blog post, an ASP.NET Core microservice using Couchbase was created using docker-compose for local deployment and development purposes. Once ready for production, services are often deployed to managed Kubernetes services like AKS, EKS, GKE, etc.
This ASP.NET Core Kubernetes tutorial contains some steps that are Azure AKS specific, but the bulk of this material can be applied to any Kubernetes cluster.
ASP.NET Core Kubernetes Tutorial overview
In this ASP.NET Core Kubernetes tutorial, I’ll walk through these steps:
- Build a Docker image and push it to Docker hub
- Create an AKS cluster on Azure
- Deploy an ASP.NET Core microservice to AKS
- Deploy Couchbase Server to it using a Kubernetes operator
Additionally, I’m going to cover some optional, but very helpful topics:
- Using DNS SRV to allow the ASP.NET Core microservice to locate its database
- Setting up port forwarding with kubectl to get tunnel access to AKS pods
- Viewing the Kubernetes dashboard on AKS
- Setting up a Load Balancer service in Kubernetes to expose the ASP.NET Core microservice to the internet
Prerequisites to get the most out of this tutorial:
- Docker installed, some basic knowledge of Docker and Docker Hub
- Visual Studio installed, although this isn’t strictly necessary
- An Azure account (if you don’t have one, you can sign up now and get $200 in credit for free). If you want to use EKS, GKE, etc, you can still follow along in this tutorial, but you’ll need to substitute a few steps on your own.
- kubectl (for Kubernetes) installed
Build Docker image
Kubernetes deployments use container images. There are many options for private container registries (like Azure Container Registry), but to keep things simple for this tutorial, I’ll be using plain old Docker Hub.
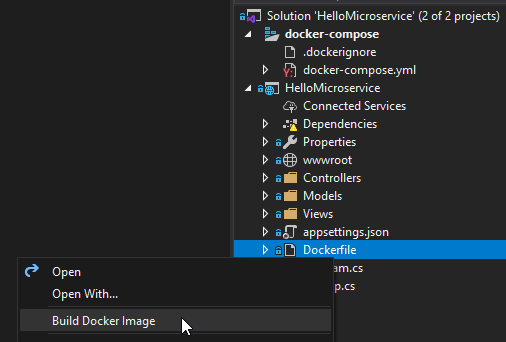
First, I’ll start by building a Docker image from the ASP.NET Core Microservice I created in the previous blog post. From Visual Studio, this is as easy as right-clicking on Dockerfile and selecting “Build Docker Image”.
Once the image is built, it will appear in your local Docker image repository. You can see this repository from the command line by using “docker images”:
|
1 2 3 4 |
PS C:\Users\mgroves> docker images REPOSITORY TAG IMAGE ID CREATED SIZE mattgroves/hellomicroservice latest b2387e47a826 3 weeks ago 213MB hellomicroservice latest b2387e47a826 3 weeks ago 213MB |
The next step is to push this image out to Docker hub (please review if you’ve not used Docker hub before). I pushed my image to Docker with the docker push mattgroves/hellomicroservice command. You will most likely want to tag your images with release numbers to make sure that Kubernetes is pulling the exact version you want to deploy.
If you want to skip this step, you can use my Docker image as an example: mattgroves/hellomicroservice.
Write YAML files for deployment
Now that you have published a Docker image, we can start to write the YAML files for a Kubernetes deployment. This tutorial will not cover everything there is to know about Kubernetes, but it will point out noteworthy sections as much as possible. For this tutorial, there will be three total YAML files created to be along with the YAML files that ship with the Couchbase Operator.
Each of these YAML files corresponds to a Kubernetes resource. Kubernetes will orchestrate the cluster based on what resources you create in the cluster.
The ASP.NET Core Microservice resource and the Couchbase Cluster resource will each result in one or more “pods” being created on the Kubernetes cluster. Other types of resources are “secrets” (to manage and store sensitive information) and “services” (to expose a set of pods), and many others.
ASP.NET Core Microservice
Let’s start by creating a YAML file for the ASP.NET Core microservice deployment itself:
|
1 2 3 4 5 6 7 8 9 10 11 12 13 14 15 16 17 18 19 20 21 22 23 24 25 26 27 28 29 30 31 32 33 34 35 36 37 38 39 40 41 |
apiVersion: apps/v1beta1 # for versions before 1.8.0 use apps/v1beta1 kind: Deployment metadata: name: hello-microservice-app-deployment spec: selector: matchLabels: app: hello-microservice-app replicas: 1 # tells deployment to run # pods matching the template template: # create pods using pod definition in this template metadata: labels: app: hello-microservice-app spec: containers: - name: hello-microservice-app image: mattgroves/hellomicroservice imagePullPolicy: Always ports: - containerPort: 80 name: server env: - name: Couchbase__Username valueFrom: secretKeyRef: name: cb-hellomicroservices-auth key: username - name: Couchbase__Password valueFrom: secretKeyRef: name: cb-hellomicroservices-auth key: password - name: Couchbase__ConnectionString value: couchbase://cb-hellomicroservices-srv resources: requests: cpu: 100m memory: 128Mi limits: cpu: 250m memory: 256Mi |
Notes on hello-microservice.yaml:
spec.replicas: This tells Kubernetes how many pods of this service to create. To start with, 1 is fine, but as you scale, you will need more pods (and likely a LoadBalancer, which will be covered later).spec.template.spec.containers.image: This tells Kubernetes which images to use. In my case, mattgroves/hellomicroservice is the one built earlier in this tutorial and deployed to Docker hubenv: These define environment variables for each container. Instead of hardcoding these credentials in the image, I’m passing a Username, Password, and ConnectionString to the ASP.NET Core microservice, much like was done in the previous blog post. More on the Couchbase__ConnectionString and DNS SRV later.- You can also use “service.namespace” if the Couchbase cluster lives in another namespace.
Couchbase Cluster
Next, here’s a YAML file for the database, which uses the Couchbase Kubernetes Operator:
|
1 2 3 4 5 6 7 8 9 10 11 12 13 14 15 16 17 18 19 20 21 22 23 24 25 26 27 28 29 30 31 32 33 34 35 36 37 38 39 40 |
apiVersion: couchbase.com/v1 kind: CouchbaseCluster metadata: name: cb-hellomicroservices spec: baseImage: couchbase version: 6.5.0-beta2 authSecret: cb-hellomicroservices-auth exposeAdminConsole: true adminConsoleServices: - data cluster: dataServiceMemoryQuota: 256 indexServiceMemoryQuota: 256 searchServiceMemoryQuota: 256 eventingServiceMemoryQuota: 256 analyticsServiceMemoryQuota: 1024 indexStorageSetting: plasma autoFailoverTimeout: 30 autoFailoverMaxCount: 3 autoFailoverOnDataDiskIssues: true autoFailoverOnDataDiskIssuesTimePeriod: 30 autoFailoverServerGroup: false buckets: - name: hellomicroservice type: couchbase memoryQuota: 256 replicas: 0 ioPriority: high evictionPolicy: fullEviction conflictResolution: seqno enableFlush: false enableIndexReplica: false servers: - size: 1 name: all_services services: - data - index - query |
This YAML file by itself isn’t enough to use the Operator, but the Operator installation will come later in this tutorial. Also note that while the Operator pattern is an increasingly common and effective way to manage stateful software in Kubernetes, the YAML will vary based on which database you are using (i.e. this YAML will only work for Couchbase Server).
Notes on couchbase-cluster.yaml:
spec.version: this specifies which Couchbase container image to use. I’m using the beta2 release. As of this writing, the operator only works with the Enterprise version. This may change soon.spec.cluster,spec.buckets,spec.servers: these define various settings for the Couchbase Server cluster. Please consult the documentation for the full listing of settings. This example file only covers a handful.
Couchbase “secrets”
I’ve also created a “secret” resource. Secrets are where configuration information like credentials, passwords, authorization tokens, etc, can be stored and managed with the Kubernetes API itself.
|
1 2 3 4 5 6 7 8 |
apiVersion: v1 kind: Secret metadata: name: cb-hellomicroservices-auth type: Opaque data: username: QWRtaW5pc3RyYXRvcg== # Administrator password: cGFzc3dvcmQ= # password |
This secret contains the credentials that I want Couchbase (as well as the ASP.NET Core microservice) to use. The values are encoded in base64 (actual values in the comments). These example credentials are NOT sufficient for a real deployment: please change them to something harder to guess.
Note the metadata.name is “cb-hellomicroservices-auth”. Look back to hello-microservice.yaml and couchbase-cluster.yaml to see how these secrets are referenced.
DNS SRV
Look back to hello-microservice.yaml again. Under env, notice the name/value pair of “Couchbase__ConnectionString” and “couchbase://cb-hellomicroservices-srv”. Instead of giving ASP.NET Core IP address or URLs of Couchbase Server nodes, I’m using a connection string to direct it to a DNS SRV entry.
In a Couchbase Cluster, the actual pods running Couchbase have potential to change their names on a regular basis. Therefore, it’s recommended to use DNS SRV to locate the Couchbase service. Fortunately, the Couchbase Autonomous Operator creates a DNS SRV entry for us automatically.
We’ll soon be able to see it in the Kubernetes Dashboard, but in the meantime, just note that it will be the name of the Couchbase Cluster plus “-srv”. So in our case, it’s “cb-hellomicroservices-srv”.
I’ve made one minor change to the ASP.NET Core Microservice since the previous blog post: I’m now using the Couchbase.Extensions.DnsDiscovery library.
Besides adding this library from NuGet, and using ConnectionString instead of Server in appsettings.json, the only other change that needs to be made is to AddCouchbaseDnsDiscovery within the ConfigureServices method.
|
1 2 |
services.AddCouchbase(Configuration.GetSection("Couchbase")); services.AddCouchbaseDnsDiscovery(); |
It’s as easy as that. For more about DNS SRV, check out SRV records in the Kubernetes documentation.
Deployment to AKS
At this point, we’re ready to deploy to AKS. To review, here are the ingredients we have so far:
- ASP.NET Core Docker image on Docker Hub
- YAML file for the ASP.NET Core deployment
- YAML file for the Couchbase Cluster deployment
- YAML file for the Couchbase secrets (referenced by 2 and 3)
To deploy to AKS, I followed the Quickstart: Deploy an Azure Kubernetes Service cluster using the Azure CLI in the Microsoft documentation. Here is a brief summary of the steps I followed:
(If you want to use your local command line, make sure you have azure-cli installed. Otherwise, you can use the Azure Cloud Shell).
First, login to Azure: az login. You will be prompted to enter your credentials in your web browser.
After you have logged in, first create a “resource group”. This is an organization group within Azure. Specify a data center (I used eastus).
az group create --name helloMicroserviceGroup --location eastus
Next, create an AKS cluster using the resource group you just created. There are many options for this. To keep this exercise relatively low cost and simple, I chose to create 3 nodes using the Standard_B2s VM size. For production deployments of Couchbase, you will likely need/want more powerful sizes.
az aks create --resource-group helloMicroserviceGroup --name helloMicroserviceAks --node-count 3 --node-vm-size Standard_B2s --enable-addons monitoring --generate-ssh-keys
This step will take some time to run. Expect Azure to take around 10 minutes to setup this Kubernetes AKS cluster.
Once the cluster is created, use get-credentials to let kubectl know which cluster it will be using.
az aks get-credentials --resource-group helloMicroserviceGroup --name helloMicroserviceAks
At this point, it’s time to create some Kubernetes resources. The first six YAML files can be downloaded under “Kubernetes” couchbase.com/downloads.
|
1 2 3 4 5 6 |
kubectl create -f crd.yaml kubectl create -f admission.yaml kubectl create -f operator-role.yaml kubectl create -f operator-service-account.yaml kubectl create -f operator-role-binding.yaml kubectl create -f operator-deployment.yaml |
Next, use the three YAML files that were created in this tutorial:
|
1 2 3 |
kubectl create -f secret.yaml kubectl create -f couchbase-cluster.yaml kubectl create -f hello-microservice.yaml |
To see the state of your Kubernetes pods, use kubectl get pods. The Couchbase pods will take a few minutes to become ready.
Port forwarding
In the above deployment, none of the Kubernetes deployments are actually exposed outside of Kubernetes. One way we can check to make sure the microservice is working is by using the kubectl port-forward command. This will create a localhost “tunnel” to the given pod.
For example, let’s create a tunnel from localhost port 5000 to the ASP.NET Core microservice running on port 80:
kubectl port-forward <hello-microservice-app-deployment-…> 5000:80
At this point, you can access the microservice by using http://locahost:5000 in your browser.
Similarly, you can setup a tunnel to the built-in web based Couchbase Server UI:
kubectl port-forward cb-hellomicroservices-0000 8091:8091
And now you can access the Couchbase cluster by using http://localhost:8091.
The port-forward command can be helpful to developers and operations, but keep reading to see how to expose a Kubernetes service to the internet.
Expose service with Load Balancer
While port-forwarding can give us access to pods outside of the Kubernetes cluster, what happens when the pods inevitably crash, die and are reborn with new IP addresses, pod names, etc? Kubernetes allows us to create “services” to address one or more pods logically.
A service can be specified in the YAML files, just as the deployments are.
A service can also be created by using kubectl expose. For instance, I can expose a load balancer service that provides access to however many ASP.NET Core pods that my deployment has created:
kubectl expose deployments hello-microservice-app-deployment --port=80 --type=LoadBalancer
When the service is created, it will create an external IP address. You can view service information with kubectl get services.
|
1 2 3 4 5 6 7 8 |
PS C:\Users\mgroves> kubectl get services NAME TYPE CLUSTER-IP EXTERNAL-IP PORT(S) AGE cb-hellomicroservice ClusterIP None <none> 8091/TCP,18091/TCP 17d cb-hellomicroservice-srv ClusterIP None <none> 11210/TCP,11207/TCP 17d cb-hellomicroservice-ui NodePort 10.0.194.12 <none> 8091:30624/TCP,18091:31169/TCP 17d couchbase-operator-admission ClusterIP 10.0.218.95 <none> 443/TCP 17d kubernetes ClusterIP 10.0.0.1 <none> 443/TCP 17d hello-microservice-app-deployment LoadBalancer 10.0.6.87 20.NN.NN.21 80:32710/TCP 13s |
Open that IP address in a web browser (20.NN.NN.21 in my example), and it will be load balanced access to the pods in your deployment. As you scale up or down (i.e. change the number of replicas), the service will remain the same and continue to provide access.
Kubernetes dashboard
Kubernetes has its own UI dashboard than can be useful to get a visualization of the big picture without having to remember a bunch of command lines commands. To access the Kubernetes dashboard for AKS:
Create a ClusterRoleBinding for the Kubernetes dashboard to enable access:
kubectl create clusterrolebinding kubernetes-dashboard --clusterrole=cluster-admin --serviceaccount=kube-system:kubernetes-dashboard
Then, use Azure’s aks browse to start the dashboard:
az aks browse --resource-group helloMicroserviceGroup --name helloMicroserviceAks
This should also automatically trigger your web browser to open the dashboard:
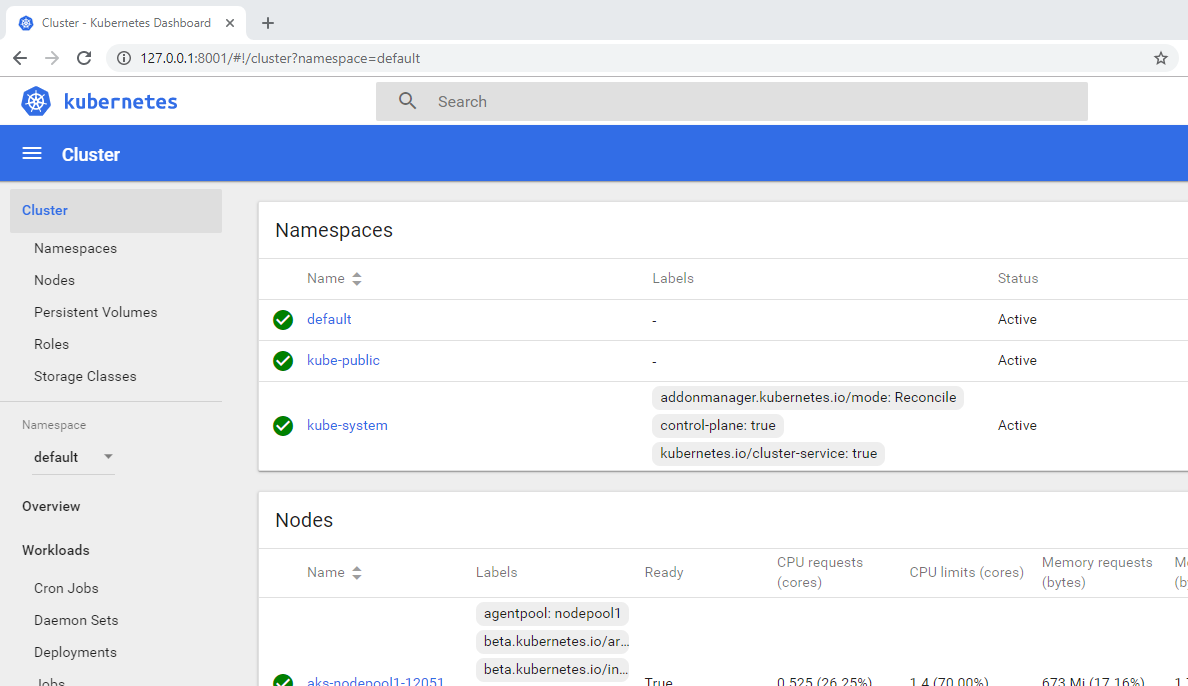
From the dashboard, you can view all the pods, services, secrets, nodes, and more.
Next steps
If you have been following along on AKS, don’t forget to remove the resource group when you are done. Otherwise, it will continue to run on your Azure account and charge you for compute time. You can remove the entire resource group from this tutorial with one command:
az group delete --name helloMicroserviceGroup
There was a lot of ground covered in this ASP.NET Core Kubernetes tutorial, but hopefully enough to point you in the right direction and get you started with a “Hello, world” example.
As in the last blog post, this ASP.NET Core Kubernetes tutorial is a product of a couple of live coding streams on Twitch. You can view part 1 and part 2 on YouTube. And if you have questions, you’re welcome to stop by the live stream on Twitch next time and chat!
Kubernetes is a very broad topic. There are a lot of directions you could go from here. Here are a few links that you might want to check out:
-
This tutorial uses version 1.2 of the Couchbase Kubernetes operator. The YAML for version 2.0 (coming soon) will be different.
-
From Microsoft AKS docs:
-
From my colleague Denis Rosa, Microservices on Kubernetes example and his blog post on Building Elastic Microservices with Kubernetes and Spring Boot
-
From Kubernetes:
-
Connecting Applications with Services, which mentions LoadBalancer
-
Reminder that this ASP.NET Core Kubernetes tutorial is a follow-up to my earlier post, link:https://www.couchbase.com/blog/asp-net-core-microservices-getting-started/
[ASP.NET Core Microservices: Getting Started]. If you haven’t read that already, you may be missing some context. -
Twilio also published a similar blog post a few months ago which uses the Azure Container Registry.